Dynamics 365 Business Central 2023 Wave 1 – Provide Title and custom actions to Error dialogs

With each update of Dynamics 365 Business Central, Microsoft enhances what is often referred to as the base application and enhances the development environment. Dynamics 365 Business Central 2023 Wave 1 has several exciting Development features for runtime 11.0. One of the exciting features is to Provide Title and custom actions to Error dialogs.

To assist users in better dealing with errors encountered while using Microsoft Dynamics 365 Business Central, a new feature was added that enables developers to allow users to select an appropriate corrective action when an error occurs. Improving the clarity of error messages is essential in instilling confidence in Business Central while streamlining the process of correcting common problems.
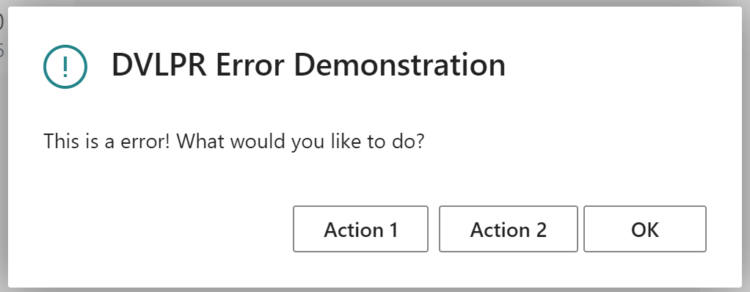
Now, developers can enhance issue descriptions by setting the Title property on Error dialogs presented to the user. Moreover, by utilizing the ErrorInfo object, developers can include up to three customized actions on the Error dialog to provide corrective measures to the user. This can be accomplished by invoking the AddAction method on the ErrorInfo object, which can be transmitted to AL methods that support ErrorInfo, including Error, TestField, FieldError, and other methods. The ErrorInfo object also has a number of properties that enhance the Telemetry information.

codeunit 50100 "DVLPR Error Management"
{
    var
        ErrorActionMsg: Label 'Action %1 for %2.\Let''s handle it', Comment = '%1 Action Number %2 Action Message';

    procedure ErrorAction1(ErrorInfo: ErrorInfo)

    begin
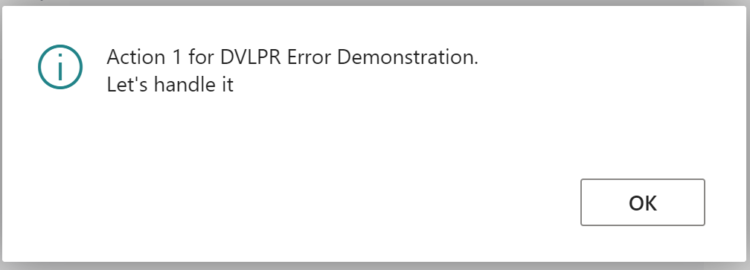
        Message(ErrorActionMsg, '1', ErrorInfo.Title);
    end;

    procedure ErrorAction2(ErrorInfo: ErrorInfo)
    begin
        Message(ErrorActionMsg, '2', ErrorInfo.Title);
    end;
}
pageextension 50100 "DVLPR Customer List Ext" extends "Customer List"
{
    actions
    {
        addlast("&Customer")
        {
            action(DVLPRError)
            {
                ApplicationArea = Basic, Suite;
                Caption = 'Error Demo';
                Image = Error;
                ToolTip = 'Demonstration Error Add Action';

                trigger OnAction()
                var
                    ErrorInfo: ErrorInfo;
                begin
                    ErrorInfo.Title := 'DVLPR Error Demonstration';
                    ErrorInfo.ErrorType := ErrorType::Client;
                    ErrorInfo.Verbosity := Verbosity::Error;
                    ErrorInfo.DataClassification := DataClassification::CustomerContent;
                    ErrorInfo.Message := 'This is a error! What would you like to do?';
                    ErrorInfo.AddAction('Action 1', Codeunit::"DVLPR Error Management", 'ErrorAction1');
                    ErrorInfo.AddAction('Action 2', Codeunit::"DVLPR Error Management", 'ErrorAction2');

                    Error(ErrorInfo);
                end;
            }
        }
    }
}

The AddAction method accepts three parameters:

  • Caption: The text string that appears as the caption of the action in the error UI.
  • CodeunitID: The ID of the Codeunit to run when the action is initiated from the error UI. The codeunit should contain at least one global method to be called by the error action. The global method must have an ErrorInfo data type parameter for accepting the ErrorInfo object.
  • Method Name: The name of the method in the Codeunit, which is specified by the CodeunitID parameter, that you want to run for the action.

Read more about the feature Provide Title and custom actions to Error dialogs here.

Note: The code and information discussed in this article is for informational and demonstration purposes only. This content was created referencing Microsoft Dynamics 365 Business Central 2023 Wave 1 online.

Dynamics 365 Business Central 2023 Wave 1 – Set up and sync master data across companies

With each update of Dynamics 365 Business Central, Microsoft enhances what is often referred to as the base application and enhances the development environment. Dynamics 365 Business Central 2023 Wave 1 has several exciting Application features for runtime 11.0. One of the exciting features is to Set up and sync master data across companies.

With Microsoft Dynamics 365 Business Central, transferring a company’s setup to another company within the same environment is straightforward. Additionally, you can synchronize the master data between the companies. The master data management feature allows you to transfer the setup from one company to another within the same environment. Furthermore, it serves as a data synchronization engine, ensuring that the companies’ data remains synchronized after the initial transfer.

The Master Data Management Setup page is where you can activate the master data management feature and access synchronization tables and logs to trigger synchronizations.

Set Up Master Data Synchronization

  • Open Business Central in a company that you would like to synchronize with a master company
  • Search for Master Data Management Setup
  • Select the Master Data Management Setup Administration Task from the search result list.
  • On the Master Data Management Setup Page, select the Source Company for Master Data that will be synchronized and set the Enable Data Synchronization value.
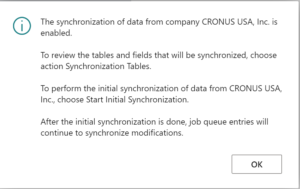
  • When you enable synchronization, a message will be displayed explaining the steps needed to finish the setup of the Master Data Synchronization.
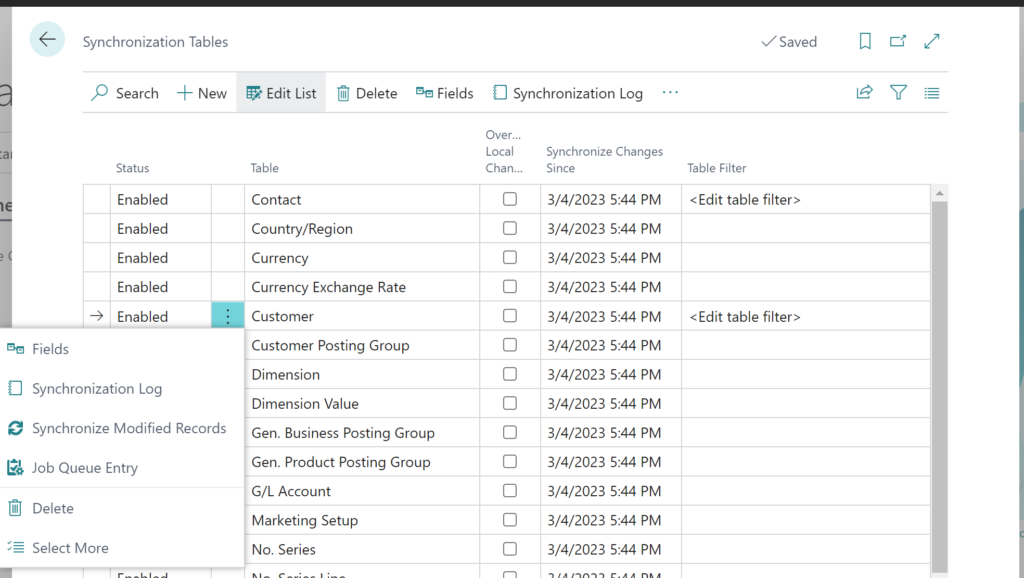
  • Select the Synchronization Tables Action from the Action bar to open the Synchronization Tables page, where you enable the tables and filters for the master records to synchronize from the source company.
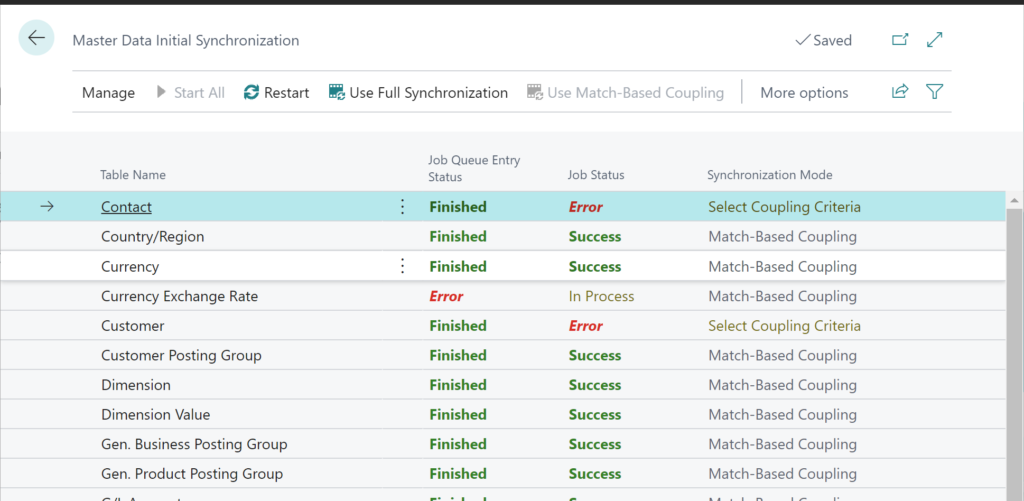
  • Once the master data tables and filters are defined, select the action to open the Master Data Initial Synchronization page and click the Start All action from the menu. The Master Data Initial Synchronization will show the status of the initial data synchronization. Note: You may need to adjust the data coupling in Synchronization Mode for some tables
  • After the initial synchronization, the master data is synchronized using Job Queues.

Master data is synchronized when a company subscribes to data from another company. You can specify the tables, table filters, and fields that require synchronization. Advanced synchronization coupling can also be set up. The job queue ensures that changes to the primary company are immediately transferred to the receiving companies. Users in the receiving company can review the synchronization logs.

Read more about the feature Set up and sync master data across companies here.

Note: The code and information discussed in this article are for informational and demonstration purposes only. This content was created referencing Microsoft Dynamics 365 Business Central 2023 Wave 1 online.

Dynamics 365 Business Central 2023 Wave 1 – AL Explorer and AL Home in Visual Studio Code AL extension

With each update of Dynamics 365 Business Central, Microsoft enhances what is often referred to as the base application and enhances the development environment. Dynamics 365 Business Central 2023 Wave 1 has several exciting Development features for runtime 11.0. One of the exciting features is to AL Explorer and AL Home in Visual Studio Code AL extension.

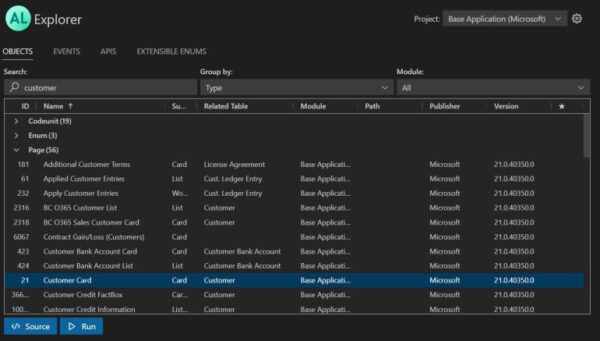
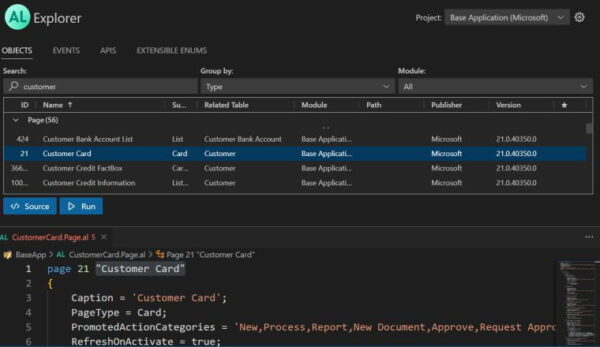
The AL Explorer is a new tool that allows developers and technical consultants to better understand objects in extensions without looking at the code. With this tool, developers can explore and navigate object details, dependencies, and extension points, increasing productivity and allowing technical consultants to understand high-level extension structures. The AL Explorer also sets the foundation for future visual editors that can further improve productivity and lower ramp-up time for new developers. The AL Explorer lists objects included in the Base Application and those in the open project.

Furthermore, the AL Explorer empowers technical consultants to perform mock-ups and light modifications to Business Central without working directly in code. They can still be part of integrated CI/CD processes, including pro developer reviews, approvals, and automated tests and deployment. This tool offers developers and technical consultants an excellent opportunity to enhance daily productivity. It sets a path towards a more efficient and effective way of developing and maintaining extensions in Business Central.

View, search, and filter objects

Obtaining an overview of all the objects within a particular app scope is effortless, such as an entire workspace or a chosen project. Additionally, you can search for object names and categorize them by type.

Go to source code

You can jump to it if you need to develop, read, and comprehend a selected object’s source code or add breakpoints as part of troubleshooting.

Bookmark

By bookmarking frequently used objects, you can conveniently filter a list of objects to show only the bookmarked ones, which is especially helpful when switching between the ones you are currently working on.

View extension points – events, APIs, and enums

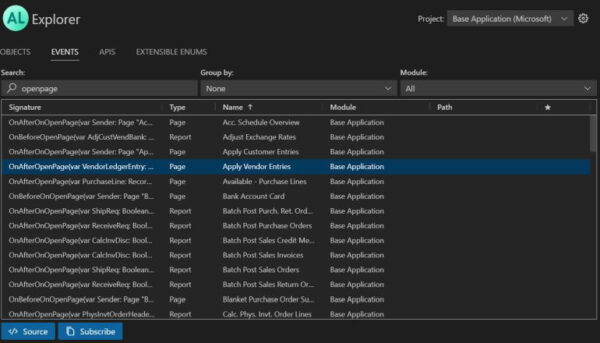
AL Explorer makes it easier to create extension points and extend existing ones by providing a quick overview of all events and API pages, and extensible enums that implement interfaces.

AL Home

With the introduction of the new AL Home startup page, Business Central R&D now has a more efficient communication channel to share news, best practices, upcoming events, urgent information, status updates, learning content, and other important information to all users of the AL Visual Studio Code extension.

Read more about the feature AL Explorer and AL Home in Visual Studio Code AL extension here.

Note: The code and information discussed in this article is for informational and demonstration purposes only. This content was created referencing Microsoft Dynamics 365 Business Central 2023 Wave 1 online.

Public Preview for Microsoft Dynamics 365 Business Central 2023 release wave 1 (BC22) is available

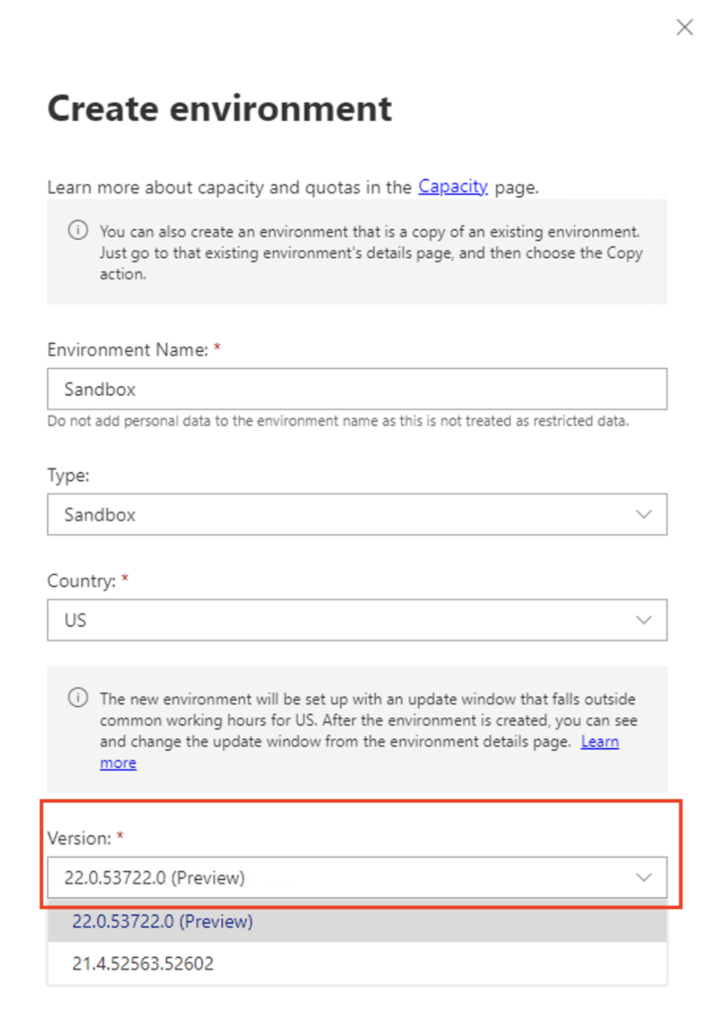
The Public Preview of Microsoft Dynamics 365 Business Central is now available to Online Customers. Online Customers can create a Sandbox Environment with the 2023 Wave 1 Preview from the Dynamics 365 Business Central admin center.

As noted when creating the Preview Environment “Sandboxes on a preview version are intended only for testing and review of features coming in the next release. The environment may be updated to a new preview version or deleted with or without notice. The environment cannot be updated to a production version. It must remain in preview until it is deleted.”

Learn more about the new features in Microsoft Dynamics 365 Business Central 2023 Wave 1!

Real things I’m asked –What is ERP Software?

Enterprise Resource Planning (ERP) software is a business management software that helps organizations automate and integrate various aspects of their business processes, such as finance, human resources, supply chain management, inventory management, customer relationship management, and more.

An ERP system typically consists of integrated applications designed to collect and manage data from various departments in an organization. The software allows different departments to share information and communicate in real time, which can help streamline operations, improve efficiency, and increase visibility into business processes.

Some of the benefits of using ERP software include the following:

  1. Increased Scalability: An ERP system can grow and adapt to the changing needs of an organization, making it a flexible solution for businesses of all sizes.
  2. Improved Efficiency: ERP software integrates all business processes into one system, which helps to streamline operations and reduce the need for manual processes. By automating various functions, an ERP system can reduce the time and effort required to complete tasks.
  3. Enhanced Visibility and Better Decision-Making: ERP software provides a unified view of all business processes and activities, allowing managers and decision-makers real-time access to critical data and better decision-making.
  4. Enhanced Collaboration: By providing a centralized platform for data management, an ERP system can improve communication and collaboration between different departments in an organization.
  5. Better Inventory Management: ERP software helps track inventory levels, supply and demand, and can provide real-time data on inventory levels. It helps to reduce inventory carrying costs and prevent stockouts.
  6. Improved Customer Service: ERP software provides a centralized view of all customer data, including orders, returns, and customer interactions. Allowing for better customer service, faster response times, and improved customer satisfaction.
  7. Cost Savings: ERP software can help to reduce operational costs by eliminating the need for manual processes, reducing errors, and improving efficiency. It can also help to identify cost savings opportunities and reduce waste.
  8. Better Compliance: ERP software can help to ensure compliance with regulatory requirements by providing the necessary data and reporting capabilities to meet regulatory requirements.

In summary, ERP software can improve business operations, increase efficiency, reduce costs, and improve customer satisfaction.

Using an ‘OR’ Filter in Dynamics 365 Business Central with FilterGroup(-1)

In Microsoft Dynamics 365 Business Central, a FilterGroup contains a filter set on a Record. The current filter group can be set or retrieved with the following syntax:

[CurrGroup] := Record.FILTERGROUP([NewGroup])

Record Filters are set with the SetFitler, or SetRange Functions of a Record.

Record.SetRange(Field [,FromValue] [,ToValue]) 
Record.SetFilter(Field, String, [Value],...)

The filters set across different groups are in effect at the same time. To work with filters in a specific FilterGroup, you must first set the group and then apply the filter. Microsoft Dynamics 365 Business Central uses several FilterGroups internally within the application. The FilterGroup 0 is the user’s group when filtering from the filter dialog. A user cannot change filters set in a group other than 0.

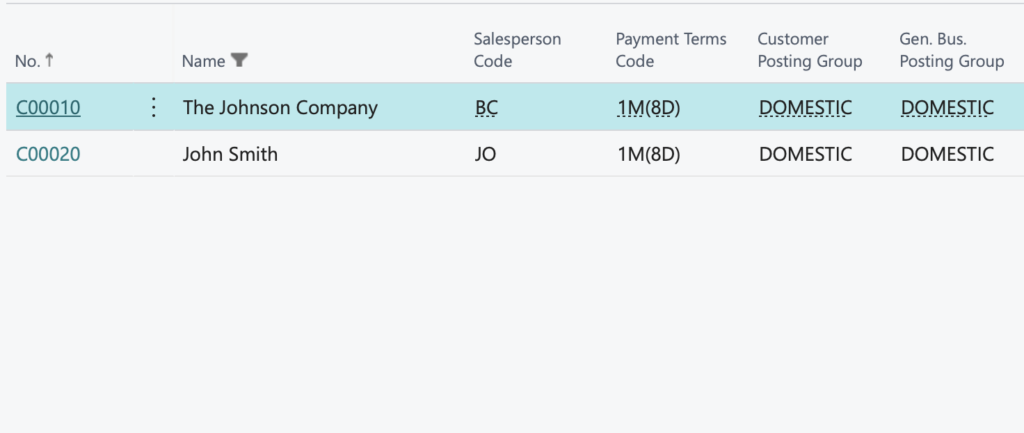
Setting Record filters in Microsoft Dynamics 365 Business Central on multiple columns, all column filters are in effect and act as a “and” filter; only records that match the criteria in all filtered columns will be displayed.

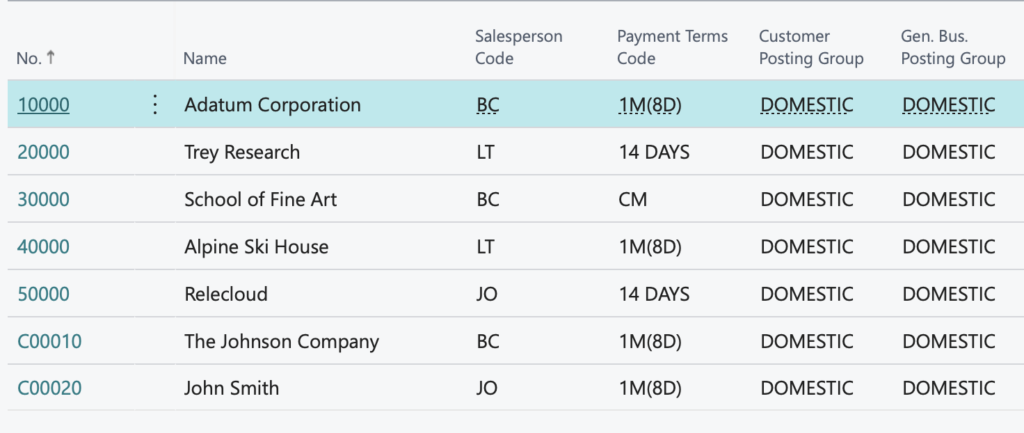
When using the Customer list above, if we apply the filter ‘@*John*’ on the name column, all Customers that contain ‘John’ are returned in the record set.

var
    Customer: Record Customer;
begin
    Customer.SetFilter(Name, '@*John*');
    Page.Run(Page::"Customer List", Customer);
end;

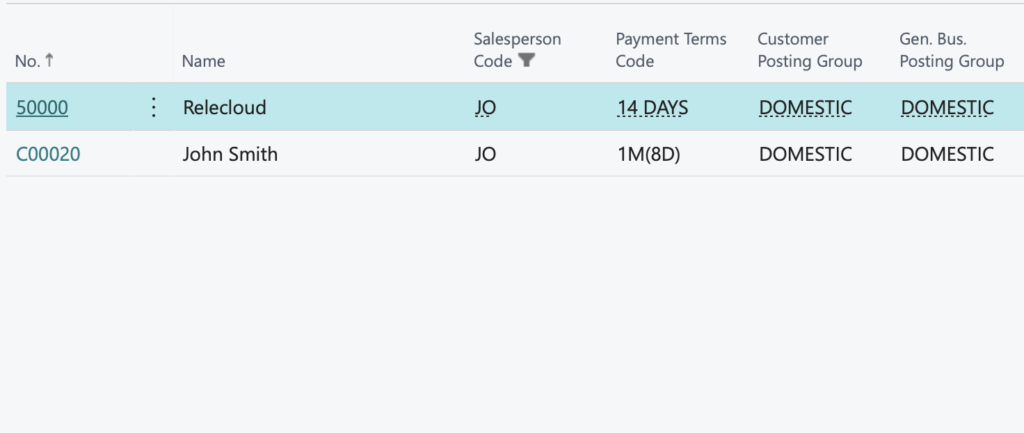
Applying a Salesperson Code filter of ‘JO’ to the same Customer list returns all Customers with the Salesperson Code ‘JO.’

var
    Customer: Record Customer;
begin
    Customer.SetFilter("Salesperson Code", 'JO');
    Page.Run(Page::"Customer List", Customer);
end;

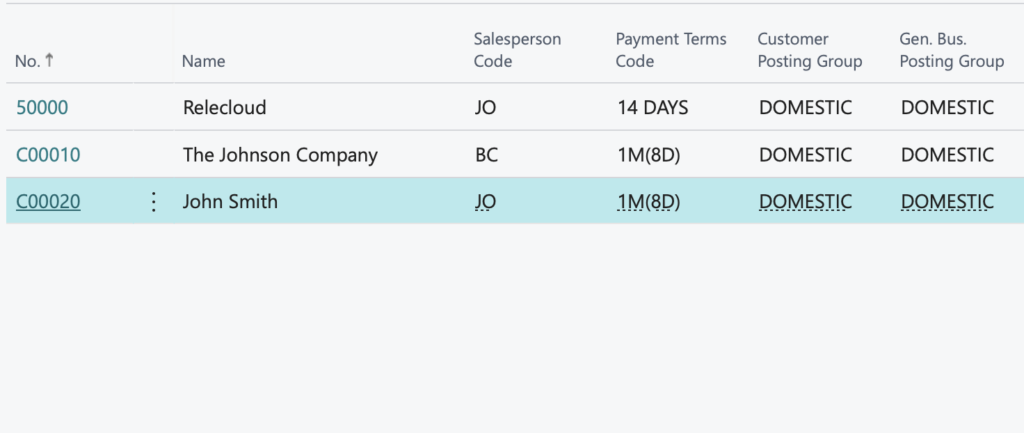
If the two filters are set together, we would only see a list of customers that match BOTH filter criteria.

The FilterGroup -1 allows you to perform a cross-column filter, treating the filters as individual filters, which act as an “or” filter. Setting the FilterGroup to -1 and applying the same set of filters, ‘*@John*’ to the Name and ‘JO’ to the Salesperson Code, results in a Recordset of Customers that have either ‘John’ in the name or JO as a Salesperson.

var
    Customer: Record Customer;
begin
    Customer.FilterGroup(-1);
    Customer.SetFilter(Name, '@*John*');
    Customer.SetFilter("Salesperson Code", 'JO');
    If Customer.FindSet() then
        repeat
            Customer.Mark(true);
        until Customer.Next = 0;

    Customer.MarkedOnly(true);

    Page.Run(Page::"Customer List", Customer);
end;

Cross-column filters do not work within the user interface. If you’d like to display the records on a page, you must do it differently by marking them using a temporary record set or another option.

Note: The code and information discussed in this article are for informational and demonstration purposes only. This content was created referencing Microsoft Dynamics 365 Business Central 2022 Wave 2 online.

Tag a Commit with Git in VS Code

Git Tag is a reference to a specific point in Git history. It marks specific releases or versions of your codebase, allowing easy recall of the exact code associated with that Tag. A Tag may track software version releases, identifies significant changes, or annotate a point in the project’s history. Git Tags are immutable; they cannot be changed once they are created. You need to delete and recreate the Tag, although the Tag can update to another commit.

As tags are intended, I often tag project commits to version codebase changes. In a recent conversation about Git Tags, a topic I am sure many do not find as exciting as I did, I reviewed how I create Tags to version commits through VS Code.

To Tag a version based on a commit, you need to know to identify the commit. A commit log is displayed when the command git log –pretty=oneline is executed in a VS Code terminal.

The commit log displayed the commit id, a tag if it exists, and the commit comment.

The syntax to tag a commit is git tag -a <tagname> -m <messge> <commit id>
After a commit is tagged, the tag information is displayed in the list, as in the following screenshots.

After a Tag, or Tags, is created, they must also be committed to the repo. Within VS Code this can be done by using the Git: Push Tags command.

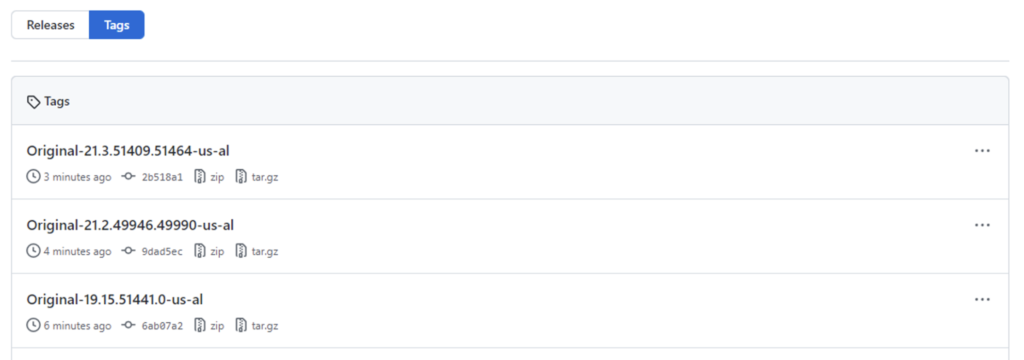
After being Pushed, tags are visible in the repo.

The screenshots are from a repo(ository) that I created a few months ago to track and review Microsoft Dynamics 365 Business Central releases (I know there are many other repos for this; sometimes it is good practice to go with it too)

Note: The code and information discussed in this article are for informational and demonstration purposes only. This content was created referencing Microsoft Dynamics 365 Business Central 2022 Wave 2 online.

February 2023 Cumulative Updates for Dynamics 365 Business Central and Microsoft Dynamics NAV

The February updates for Microsoft Dynamics NAV and Microsoft Dynamics 365 Business Central are now available.

Before applying the updates, you should confirm that your implementation is ready for the upgrade and ensure compatibility with your modifications. Work with a Microsoft Partner to determine if you are ready and what is needed for you to apply the update.

Please note that SaaS customers will automatically be upgraded to 21.4 over the coming days/weeks and should receive an email notification when upgraded.

Direct links to the cumulative updates are listed here:

Dynamics 365 Business Central On-Premises 2022 Release Wave 2 Updates – Update 21.4 (February 2023)

Dynamics 365 Business Central On-Premises 2022 Release Wave 1 Updates – Update 20.10 (February 2023)

Dynamics 365 Business Central On-Premises 2021 Release Wave 2 Updates – Update 19.16 (February 2023)

Dynamics 365 Business Central On-Premises 2021 Release Wave 1 Updates – Update 18.18 (October 2022)

Dynamics 365 Business Central On-Premises 2020 Release Wave 2 Updates – Update 17.17 (April 2022)

Dynamics 365 Business Central On-Premises 2020 Release Wave 1 Updates – Update 16.19 (January 2022)

Dynamics 365 Business Central On-Premises 2019 Release Wave 2 Updates – Update 15.17 (April 2021)

Dynamics 365 Business Central On-Premises Spring 2019 Updates – Update 44 (February 2023)

Dynamics 365 Business Central On-Premises October’18 Updates – Update 18 (April 2020)

Microsoft Dynamics NAV 2018 – Update 60 (January 2023)

Microsoft Dynamics NAV 2017 – Update Update 61 (January 2022)

Microsoft Dynamics NAV 2016 – Update 67 (July 2021)

Dynamics 365 Business Central – Sales Invoice Discounts

Companies in price-sensitive markets often need flexible pricing strategies to attract and retain customers. One way to do this is by offering discounts, either individually or to groups of customers.
In Microsoft Dynamics 365 Business Central, two sales discounts are available: line and invoice discounts.

In a previous article I had discussed the how to offer the discount features at the order-line level based on various criteria in Microsoft Dynamics 365 Business Central. 

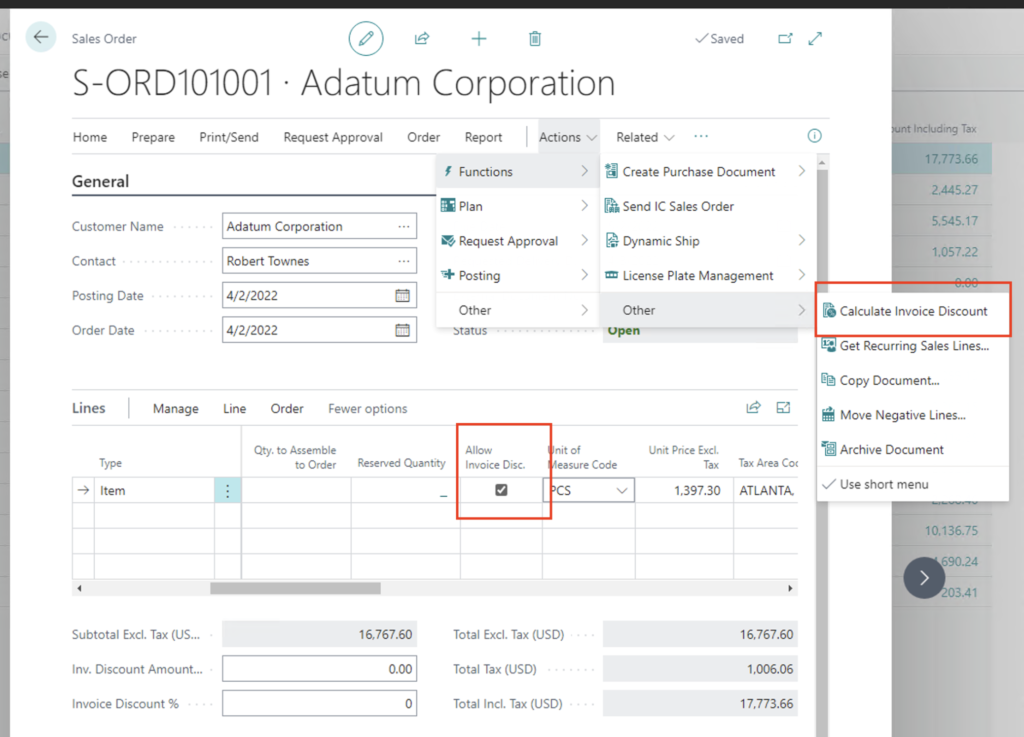
In addition to Sales Line Discounts, you can use a Sales Invoice Discount. A Sales Invoice Discount in Microsoft Dynamics 365 Business Central is a percentage discount subtracted from the document total if the value of all lines on a sales document exceeds a certain minimum. The discount is calculated based on all lines, not only item(s) on the sales document where the Allow Invoice Disc. (Note: The Allow Invoice Disc. field may need to be made visible on the page view. The default for an item can also be set on the Item Card) value is checked. By default, invoice discounts are allowed. However, lines with item charges, for example, are not included in the calculation of the invoice discount.

Sales Invoice Discounts are set for each customer by selecting the “Invoice Discount” action from the Related menu on the action ribbon. Enter the requirements, such as Currency Code, Minimum Amount and/or Service Charge for the Invoice Discount on the Cust. Invoice Discounts page.

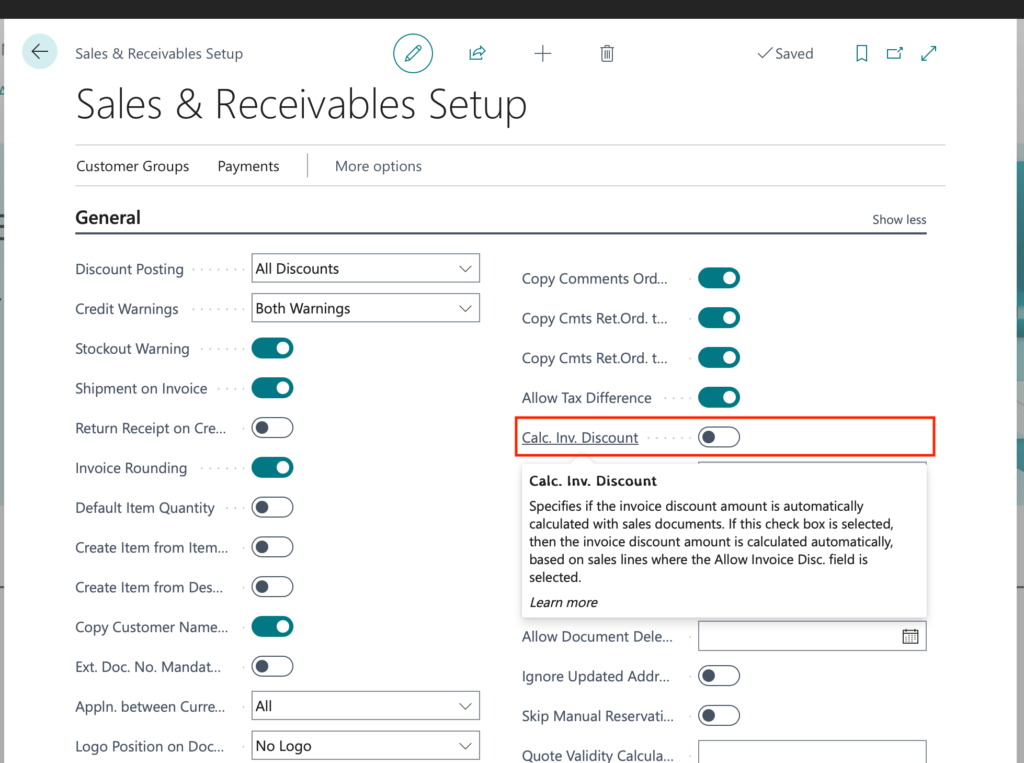
When using invoice discounts, it’s important to decide if they will be calculated automatically or manually. The “Calc. Inv. Discount” setting on the Sales & Receivables Setup page Specifies if the invoice discount amount is automatically calculated on sales documents. If the check box is selected, the invoice discount amount is calculated automatically, based on sales lines where the Allow Invoice Disc. field is enabled. When not calculating Sales Invoice Discounts automatically, they are manually calculated by selecting the “Calculate Invoice Discount” action from the Related Menu Item (refer to previous screenshot). 

Note: The code and information discussed in this article are for informational and demonstration purposes only. This content was created referencing Microsoft Dynamics 365 Business Central 2022 Wave 2 online.

Dynamics 365 Business Central – Sales Line Discounts

Companies in price-sensitive markets often need flexible pricing strategies to attract and retain customers. One way to do this is by offering discounts, either individually or to groups of customers.
In Microsoft Dynamics 365 Business Central, two sales discounts are available: line and invoice discounts.

The discount features in Microsoft Dynamics 365 Business Central include offering discounts at the order-line level based on various criteria and providing discounts to customers at the invoice level. The discount functionality is also fully integrated into all relevant sales, marketing, and accounting processes, making it easy and consistent.

Working with Sales Line Discounts 

In Microsoft Dynamics 365 Business Central, Sales Line Discounts are item-related discounts assigned to customers based on conditions such as minimum item quantity, unit of measure, or date range.

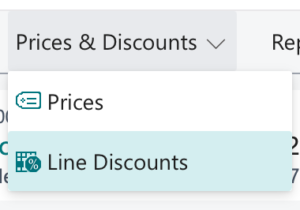
Open the Sales Line Discounts page from the Item Card or Customer Card by selecting Line Discounts action from the Prices & Discounts Menu.

  • Enter the Sales Type for the discount
    • Customer – the line discount is for a specific Customer
    • Customer Disc. Group – the line discount is for Customers assigned to a Discount Group.
    • All Customers – the line discount is for All Customers.
    • Campaign – the line discount for a Sales Campaign
  • Sales Code – enter the value related to the Sales Type value for the Sales Line Discount. 
    •  Sales Type of Customer – Enter the Customer No for the Customer that receives the line discount
    • Sales Type of Customer Disc. Group – Enter the Customer Disc. Group for the Group that receives the Sales Line Discount
    • Sales Type of All Customers – no value entered
    • Sales Type of Campaign – Enter the Campaign that receives the Sales Line Discount
  • Enter the Type for the discount
    • Item – the line discount is for a specific Item
    • Item Discount Group – the line discount is for Items assigned to a Discount Group.
  • Code – enter the value related to the Type value for the Sales Line Discount 
    • Type of Item – Enter the Item No for the Item with line discount
    • Type of Item Discount Group – Enter the Item Discount Group for the group of items with the line discount
  • Unit of Measure Code – If the line discount is for a specific Unit of Measure Code, enter the unit of measure code for the type sold that receives the Sales Line Discount, if applicable
  • Minimum Quantity – if the Sales Line Discount is applicable for a minimum quantity ordered for the Item, enter the minimum quantity needed to receive the Sales Line Discount.
  • Starting Date and Ending Date – If the Sales Line Discount is effective for a specific date range, enter the starting and ending date for the date range the Sales Line Discount is valid
  • Line Discount % – the line discount for the Item, for the Sales Line Discount options.

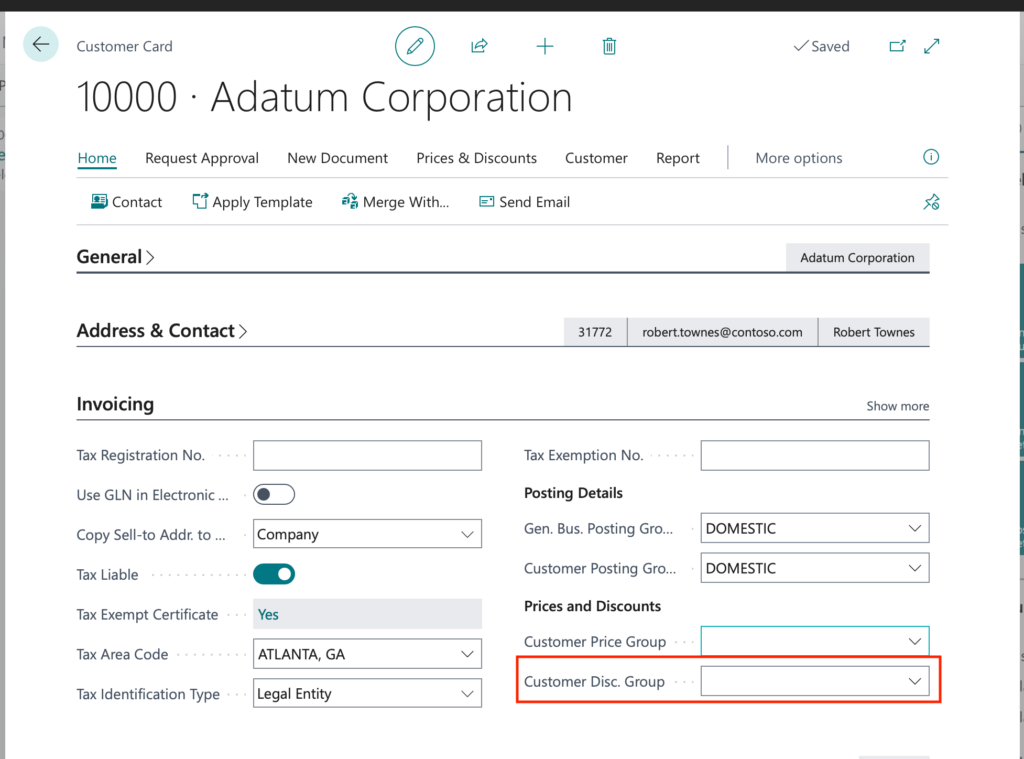
When working with Customer Disc. Groups, a Customer can be assigned to a Discount Group by populating the Customer Disc. Group value on the Invoicing Fast Tab of the Customer Card.

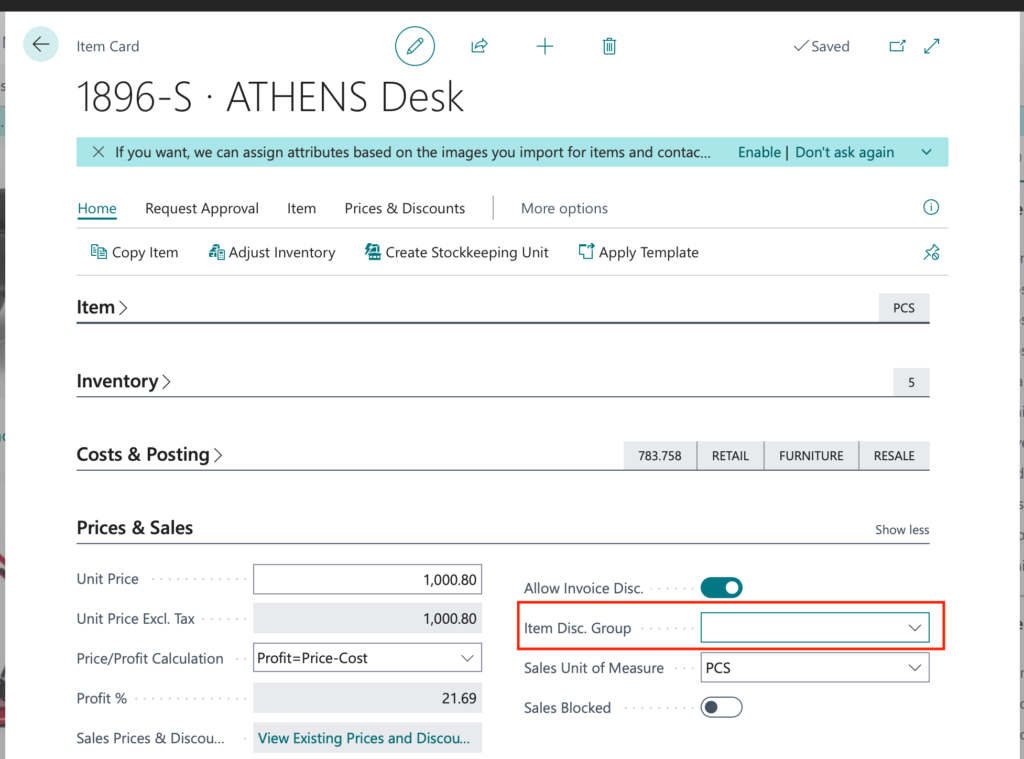
When working with Item Disc. Groups, an Item  can be assigned to a Discount Group by populating the Item Disc. Group value on the Invoicing Fast Tab of the Item Card.

You can read more on how to Manage Sales Prices in Business Central here.

Note: The code and information discussed in this article are for informational and demonstration purposes only. This content was created referencing Microsoft Dynamics 365 Business Central 2022 Wave 2 online.