What Is a Control Add-in in Business Central?
A control add-in is an AL object you use to embed a custom web-based UI component inside the Business Central client. Think of it as a bridge between the Business Central page framework and HTML/JavaScript/CSS running in the browser client. The client hosts the add-in on a page (typically rendered in an iframe) and loads the JavaScript and CSS packaged with your extension.
The key concept is that Business Central renders the add-in in the client, and you communicate between AL and JavaScript using events (JS → AL) and procedures (AL → JS).
I’ve been having a lot of fun building control add-ins and vibe-coded something fun for the holiday.
You can find the full code for the example on GitHub.
How Control Add-ins Work
When a page that contains a usercontrol is opened, the Business Central web client loads the add-in resources packaged in your extension (JavaScript, CSS, images). The add-in renders into a host container in the page.
From there, the integration is two-way:
- JavaScript raises events back to AL using
Microsoft.Dynamics.NAV.InvokeExtensibilityMethod('EventName', [args]). - AL calls JavaScript functions by invoking procedures declared on the
controladdinobject (which must exist in your JS runtime).
You can think of it as:
- Events: “JavaScript is telling AL something happened.”
- Procedures: “AL is telling JavaScript to update the UI.”
Creating a Control Add-in Object
To get started, you’ll typically:
- Create a
controladdinobject in AL. - Add your JS/CSS files to the extension (often under an
addin/orcontroladdin/folder). - Reference those files from
Scripts,StartupScript, andStyleSheets. - Define events (JS → AL) and procedures (AL → JS).
- Place it on a page using a
usercontrol.
Here’s the control add-in definition for my holiday example:
controladdin DVLPRControlAddIn
{
    HorizontalShrink = true;
    HorizontalStretch = true;
    MaximumHeight = 300;
    MaximumWidth = 700;
    MinimumHeight = 300;
    MinimumWidth = 700;
    RequestedHeight = 300;
    RequestedWidth = 700;
    Scripts = 'controladdin/scripts.js';
    StartupScript = 'controladdin/start.js';
    StyleSheets = 'controladdin/style.css';
    VerticalShrink = true;
    VerticalStretch = true;

    procedure Animate()
    procedure Render(html: Text);
    event OnControlAddInReady();
    event ShowError(ErrorTxt: Text);
}
A few notes on those properties:
StartupScriptis typically used to bootstrap the control and indicate the initial trigger to invoke on the page that contains the add-in.Scriptsis where you put the bulk of your implementation (functions that AL procedures call, helpers, etc.).StyleSheetsis optional, but recommended for maintainability.- Sizing properties (
RequestedHeight,MinimumHeight,VerticalStretch, etc.) help your add-in behave predictably in pages.
Using the Control Add-in on a Page
Once the controladdin exists, you host it on a page via usercontrol. Below is a simple Card page example that:
- Receives a JavaScript event when the control is loaded and ready (JS → AL event).
- Calls JavaScript procedures to render HTML and start an animation (AL → JS procedures).
page 50100 "DVLPR Christmas Tree Page"
{
ApplicationArea = All;
Caption = 'Christmas Tree';
UsageCategory = Lists;
layout
{
area(Content)
{
group(controls)
{
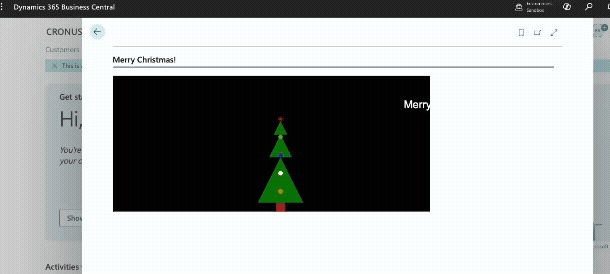
Caption = 'Merry Christmas!';
usercontrol(PageControlAddIn; DVLPRControlAddIn)
{
trigger OnControlAddInReady()
begin
CurrPage.PageControlAddIn.Render(@'
<div id="scrolltext">Merry Christmas!</div>
<div class="tree">
<div class="lights">
<div class="light"></div>
<div class="light"></div>
<div class="light"></div>
<div class="light"></div>
<div class="light"></div>
<div class="stump"></div>
</div>
</div>');
CurrPage.PageControlAddIn.Animate();
end;
trigger ShowError(ErrorTxt: Text)
begin
Error(ErrorTxt);
end;
}
}
}
}
}
OnControlAddInReady() is your “safe moment” to start calling procedures into JavaScript, because the client has loaded the resources and the JavaScript runtime is initialized.
Note: In Business Central 2025 Wave 1 and later, you can also use the new UserControlHost page type to host control add-ins in a full-page experience.
Learn more about that here.
JavaScript: Rendering UI and Calling Back into AL
Now for the JavaScript side. The easiest pattern is:
- In
start.js: signal that the add-in is ready. - When something happens: call
Microsoft.Dynamics.NAV.InvokeExtensibilityMethod(...)with the event name defined in AL. The Business Central client will route that to your AL event handler.
controladdin/start.js
Microsoft.Dynamics.NAV.InvokeExtensibilityMethod('OnControlAddInReady', []);
That InvokeExtensibilityMethod call maps directly to the AL event:
trigger OnControlAddInReady()
begin
end;
So the Business Central client will invoke the trigger OnControlAddInReady() block inside your usercontrol.
JavaScript: Implementing AL Procedures (AL → JS)
If you declare a procedure in the controladdin object, you must implement a matching function in JavaScript so AL can call it.
From the AL object:
procedure Render(html: Text);
Implement it in a JS file you included under Scripts (for example scripts.js):
controladdin/scripts.js
function Render(html) {
    try {
        document.getElementById('controlAddIn').innerHTML = html;
    }
    catch (e) {
        Microsoft.Dynamics.NAV.InvokeExtensibilityMethod('ShowError', [e.toString()]);
    }
}
Now this AL call will work (it passes HTML to render):
CurrPage.PageControlAddIn.Render(@'
                        <div id="scrolltext">Merry Christmas!</div>
                        <div class="tree">
                            <div class="lights">
                                <div class="light"></div>
                                <div class="light"></div>
                                <div class="light"></div>
                                <div class="light"></div>
                                <div class="light"></div>
                                <div class="stump"></div>
                            </div>
                        </div>');
CSS: Keep It Simple and Contained
A small stylesheet helps keep the markup readable:
controladdin/style.css
body {
    display: flex;
    justify-content: center;
    align-items: center;
    height: 100vh;
    background-color: #000;
    color: #fff;
    font-family: Arial, sans-serif;
}

#scrolltext {
    position: absolute;
    top: 50px;
    left: 50px;
    font-size: 24px;
    overflow-x: hidden;
    white-space: nowrap;
}

.tree {
    position: absolute;
    top: 180px;
    left: 320px;
    width: 40;
    height: 0;
    border-left: 50px solid transparent;
    border-right: 50px solid transparent;
    border-bottom: 100px solid green;
    margin-bottom: -30px;
}

.tree:before {
    content: '';
    position: absolute;
    top: -50px;
    left: -25px;
    width: 0;
    height: 0;
    border-left: 25px solid transparent;
    border-right: 25px solid transparent;
    border-bottom: 50px solid green;
}

.tree:after {
    content: '';
    position: absolute;
    top: -80px;
    left: -15px;
    width: 0;
    height: 0;
    border-left: 15px solid transparent;
    border-right: 15px solid transparent;
    border-bottom: 30px solid green;
}

.stump {
    position: absolute;
    top: 190px;
    left: 5px;
    width: 20px;
    height: 20px;
    background-color: brown;
}

.lights {
    position: absolute;
    top: -90px;
    left: -15px;
    width: 30px;
    height: 170px;
    display: flex;
    flex-direction: column;
    justify-content: space-between;
    align-items: center;
}

.light {
    width: 10px;
    height: 10px;
    border-radius: 50%;
    background-color: red;
    animation: blink 1s infinite;
}

.light:nth-child(2) {
    background-color: yellow;
    animation-delay: 0.2s;
}

.light:nth-child(3) {
    background-color: blue;
    animation-delay: 0.4s;
}

.light:nth-child(4) {
    background-color: white;
    animation-delay: 0.6s;
}

.light:nth-child(5) {
    background-color: orange;
    animation-delay: 0.8s;
}

@keyframes blink {

    0%,
    100% {
        opacity: 1;
    }

    50% {
        opacity: 0.5;
    }
}
(Keep your CSS scoped to your own classes so you don’t accidentally affect the surrounding Business Central page.)
Common Pitfalls (That Everyone Hits Once)
- Calling procedures before the control is ready: use
OnControlAddInReady()for initialization calls. - Event name mismatches: the string you pass to
InvokeExtensibilityMethod('OnControlAddInReady', ...)(orShowError) must match the AL event name exactly. - Trying to do server work in the add-in: treat it as UI; keep business logic in AL/codeunits.
Wrapping Up
Control add-ins are helpful when you need a richer client experience than standard AL page controls can provide. Once you learn the basic rhythm—declare events/procedures in AL, implement the UI in JavaScript, and connect them with InvokeExtensibilityMethod—you can build surprisingly powerful UI integrations (I’ve even created a few games within Business Central—more on that later) while keeping business logic in AL.
Learn more about the control add-in object here.
You can find the full code for the example on GitHub.
Note: The code and information discussed in this article are for informational and demonstration purposes only. This content was written referencing Microsoft Dynamics 365 Business Central 2025 Wave 2 online.
 available.