With each update of Dynamics 365 Business Central, Microsoft enhances what is often referred to as the base application and the development environment. Dynamics 365 Business Central 2024 Wave 1 has several exciting Application features, one of which is the Use of an in-client page scripting tool for acceptance testing.
Business Central 2024 Wave 1 introduces a standout feature- the In-client Page Scripting Tool – my favorite feature to date. This versatile gem is not just for user acceptance testing but a potential game-changer in various scenarios, offering unique benefits that can significantly enhance your experience.
The in-client page scripting tool, designed with utmost user-friendliness, empowers customers and consultants to record and replay user acceptance tests effortlessly. This simplicity results in higher test coverage, reduces costs, and adds consistency when testing user scenarios. The Business Central web client lets you easily record your actions, such as opening pages or entering data. Once recorded, you can save and share the script for future playback.
To access the In-client page scripting tool, open the Settings menu and select the Page Scripting Action. This will open the Page Scripting dialog, where you can start a new recording or open a previously recorded script. It’s that easy!
Click the Recording action from the Scripting page menu to start a recording. Once the recording is started, perform the actions that you would like to script and watch as the page scripting tool “records” the sequence of steps.
After completing the desired action sequence, click the Stop action on the Scripting page menu.
The Page Scripting Tool now has a sequence of steps to “Play Back” and repeat. The script is executed by clicking the Play action on the menu.
When playing back a script for testing, the script will execute the sequence exactly as recorded, which may be sufficient in some cases. Still, there may be other scenarios where you would like to use different values, such as a quantity on a Sales Order line. A valid test would consist of repeatedly entering a different quantity value for each interaction. Fortunately, the page scripting tool supports functions, allowing you to control input values.
To enter a different quantity, select the Properties action from the context menu on the input step to open the Properties editor. You can enter a constant value or a set of formulas in the properties editor. The RandBetween function is one option for inputting a random number between two values. To script the input of a random number between 2 and 8, enter RandBetween(2,8) in the properties editor.
During recording, you can manually insert special steps by right-clicking a page control, like a field, and selecting an appropriate option.
You can insert validation steps to check the outcome when playing back the recording. This inserts a validation step with the current value. To change the value, go to the validate step in the Page Scripting step list. Another option during the recording is to make some steps conditional. To insert a branch of conditional steps, right-click a page control, select Add conditional steps when, and then select an option. After the conditional step is inserted, you can add more steps to perform if the condition is met. Select End scope in the Page Scripting steps list to end the condition branch.
The In-client Page Scripting Tool is my favorite feature introduced in Business Central with 2024 Wave 1. Based on what I see in this “first “release,” I can”only imagine how it will mature with each release.
Read more about the feature Use in-client page scripting tool for acceptance testinghere.
Note: The code and information discussed in this article are for informational and demonstration purposes only. This content was created referencing Microsoft Dynamics 365 Business Central 2024 Wave 1 online.
The June updates for Microsoft Dynamics 365 Business Central are now available.
Before applying the updates, you should confirm that your implementation is ready for the upgrade and ensure compatibility with your modifications. Work with a Microsoft Partner to determine if you are ready and what is needed for you to apply the update.
Please note that Online customers will automatically be upgraded to version 24.2 over the coming days/weeks and should receive an email notification when upgraded.
Direct links to the cumulative updates are listed here:
In the recent 2024 Release Wave 1 update for Microsoft Dynamics 365 Business Central, Microsoft introduced the Business Foundation layer. This new foundation layer continues their ongoing effort to modularize and enhance the software architecture. They are breaking down the monolithic structure into smaller, more coherent, and related modules, which improves the system’s maintainability and scalability.
With the introduction of the Business Foundation layer, the Business Central architecture now operates on three distinct layers, each with its unique role and contribution to the system’s functionality.
The Business Foundation is a collection of standard ERP functionalities for various domains within the application. While not specific to any functional area, these functionalities are essential for the application’s overall operation. I relate these to “common libraries.”
The System Application in Dynamics 365 Business Central contains modules that interact with the platform and online ecosystem to support the business logic in the Base Application. I simplify this in my brain by labeling it as APIs and Azure communication.
The Base Application in Dynamics 365 Business Central refers to the core application, the foundation for the ERP software’s functional areas.
The first module added to the Business Foundation Layer is the No. Series Module. The existing NoSeriesManagement pattern has been around for as long as I can remember. To ensure compatibility, any existing code must be updated with the pattern’s update to the new module.
The existing NoSeriesManagement logic was marked obsolete in Business Central 2024 Wave 1, so there is still time to update your existing code. Here are a few examples of how the code changes to use the new pattern.
The first change, as noted, is that good old codeunit 396 NoSeriesManagement is going away. The new codeunit 310 “No. Series” manages number series.
Permanent link to this article: https://www.dvlprlife.com/2024/05/microsoft-dynamics-365-business-central-update-your-al-code-to-the-new-no-series-module/
The May updates for Microsoft Dynamics 365 Business Central are now available.
Before applying the updates, you should confirm that your implementation is ready for the upgrade and ensure compatibility with your modifications. Work with a Microsoft Partner to determine if you are ready and what is needed for you to apply the update.
Please note that Online customers will automatically be upgraded to version 24.1 over the coming days/weeks and should receive an email notification when upgraded.
Direct links to the cumulative updates are listed here:
The April updates for Microsoft Dynamics 365 Business Central are now available.
This month features the release of Business Central 2024 Wave 1
Before applying the updates, you should confirm that your implementation is ready for the upgrade and ensure compatibility with your modifications. Work with a Microsoft Partner to determine if you are ready and what is needed for you to apply the update.
Please note that Online customers will automatically be upgraded to version 24.0 over the coming days/weeks and should receive an email notification when upgraded.
Direct links to the cumulative updates are listed here:
The March updates for Microsoft Dynamics 365 Business Central are now available.
Before applying the updates, you should confirm that your implementation is ready for the upgrade and ensure compatibility with your modifications. Work with a Microsoft Partner to determine if you are ready and what is needed for you to apply the update.
Please note that Online customers will automatically be upgraded to version 23.5 over the coming days/weeks and should receive an email notification when upgraded.
The Microsoft Dynamics Nav links were removed from this post. They are still available on older posts.
Direct links to the cumulative updates are listed here:
Q: I have customers that I invoice repeatedly, how can I set that up in Business Central?
A: Setting up standard lines for recurring sales documents, such as repeated replenishment orders or recurring sales invoices, streamlines the invoice creation process. This approach ensures consistency in information, saves time, and reduces the likelihood of errors, making the overall sales transaction process more efficient and reliable.
Microsoft Dynamic 365 Business Centrals allows you to set standard sales invoice lines for customers to simplify the creation of recurring documents.
Search for “Recurring Sales Lines” using the Search feature of Business Central and navigate to the “Recurring Sales Lines Page.”
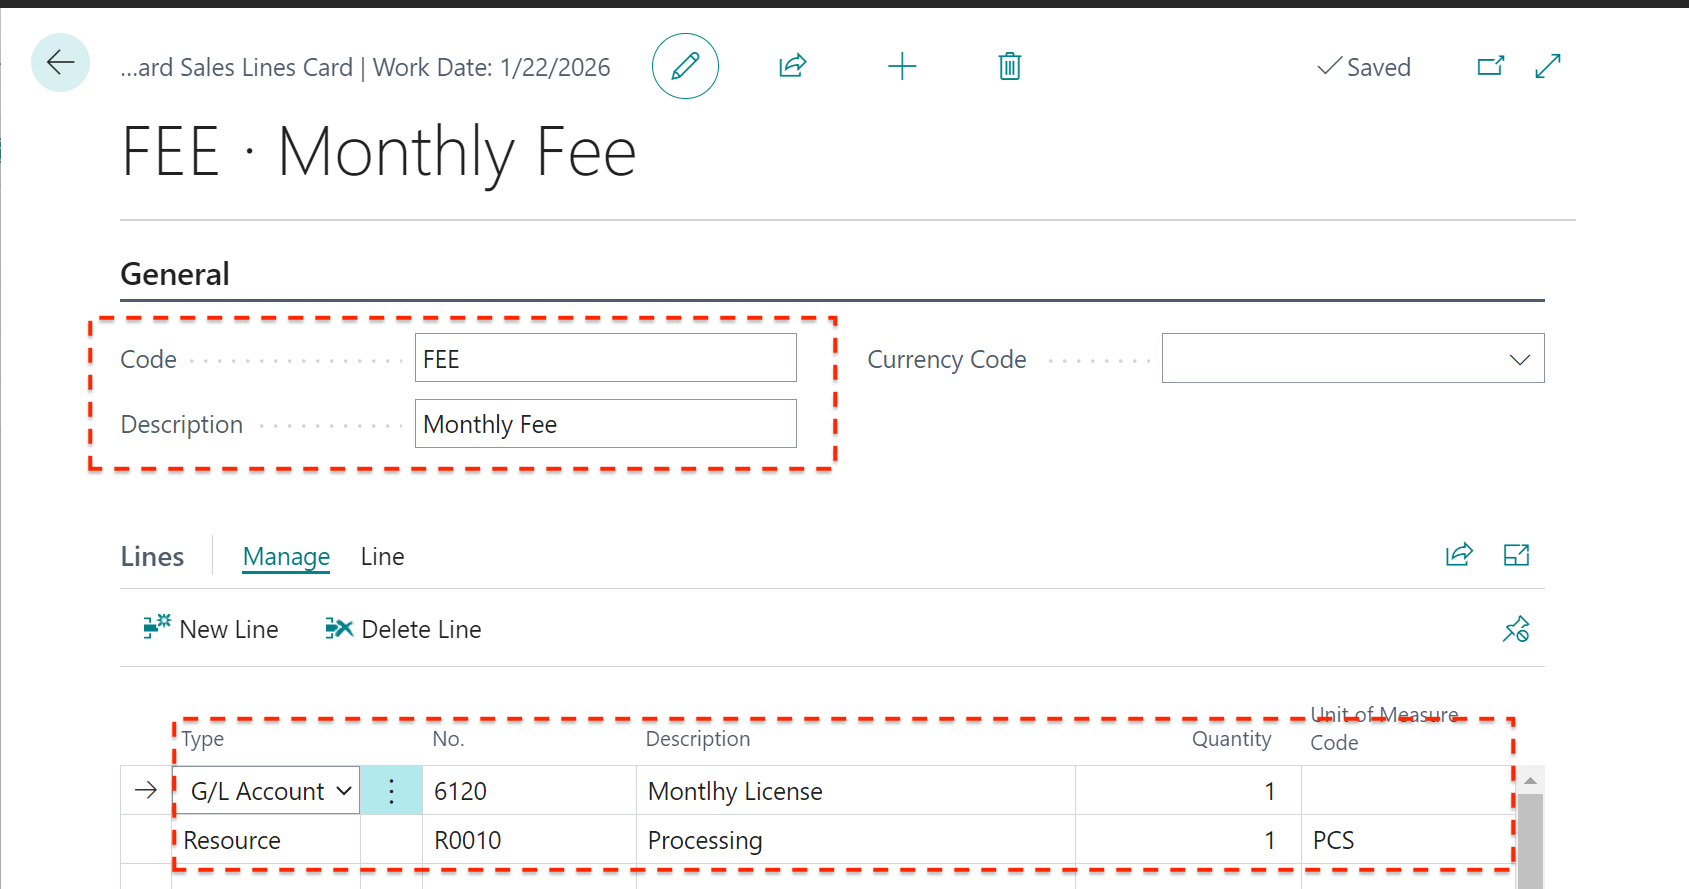
To add a new standard invoice line, select the New Action and fill in a Code, Description, and Currency (if applicable) on the General tab.
Select the Manage Action on the action bar to modify an existing standard invoice line.
Enter the standard sales lines to add to a sales document when the standard sales line code is selected. Select the type of line to add; enter G/L Account, Item, Resource, Fixed Asset, Charge (Item), or Allocation Unit lines, along with the other desired values such as description, quantity, unit of measure, and dimensions.
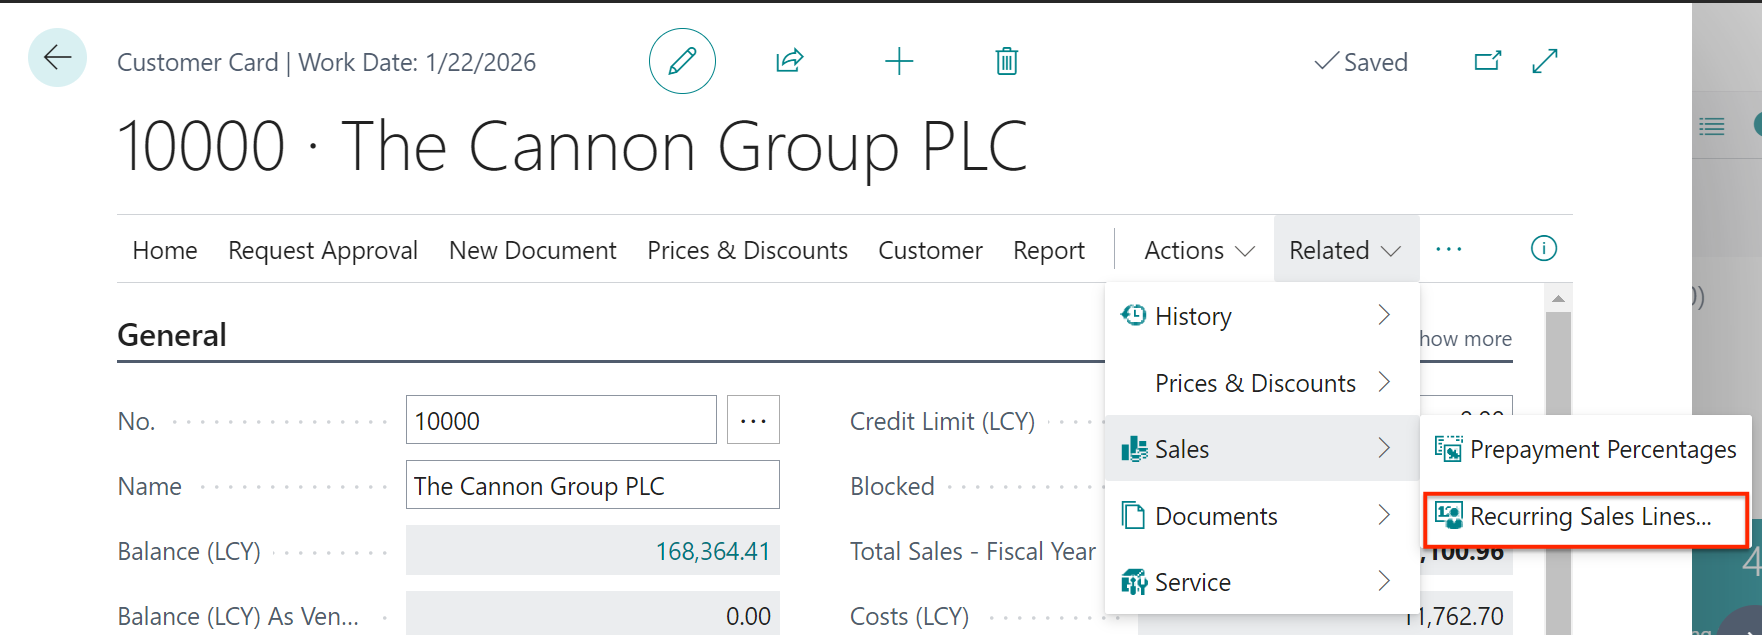
After you have set the standard sales invoice lines, assign the recurring sales lines to the customers that will use the code.
Navigate to a Customer to assign recurring code by choosing the Recurring Sales Lines action from the Related then Sales action menu. Choose the codes for the recurring sales lines you want to insert on sales documents for the customer. Fill in the other fields to define when, how, and where Business Central will add the recurring sales lines. You can enter a date range and determine when the lines will be added to the different sales document types, manually or automatically.
Recurring sales invoice lines will be automatically added to the sales documents where you have specified automatic insertion. If you specify Always Ask, a user will see a notification after selecting the customer that Recurring Sales Lines exist and will be provided the option to add those lines to the document.
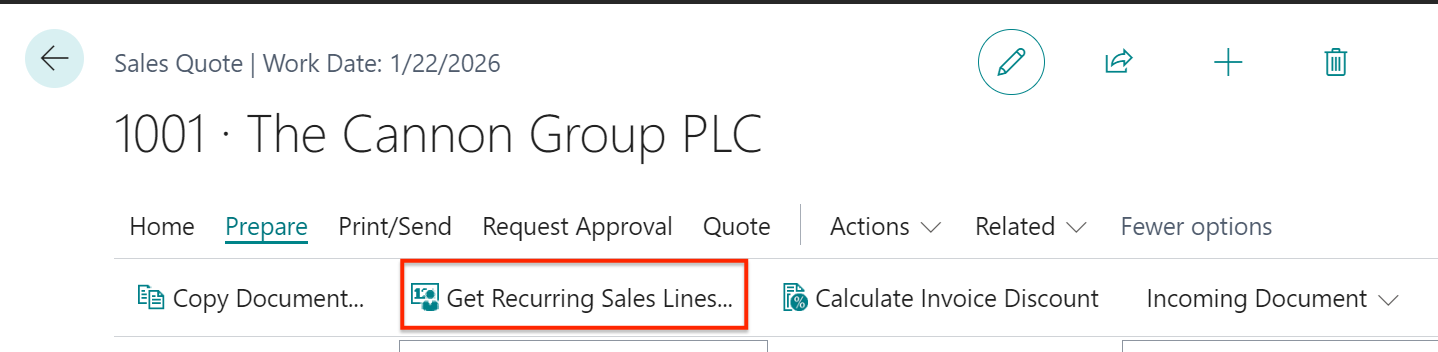
To manually add the sales lines, select the Get Recurring Sales Lines from the prepare action on the document.
Create multiple sales invoices based on recurring lines using the Create Recurring Sales Invoices batch job. Enter the code for standard sales lines assigned to a customer in the Code filter field, and choose the OK button to create sales invoices for customers with the specified standard customer sales code and posting dates within the valid-from and valid-to dates set on the standard sales lines. The system will use actual prices and discounts valid on the document date to find the best combination with the lowest price.
Learn more about Standard Recurring Sales Lines here.
Note: The code and information discussed in this article are for informational and demonstration purposes only. This content was created referencing Microsoft Dynamics 365 Business Central 2023 Wave 2 online.
Permanent link to this article: https://www.dvlprlife.com/2024/02/real-things-im-asked-microsoft-dynamics-365-business-central-recurring-sales-invoices/
In October 2022, Microsoft announced a new open-source program for the Business Central Base Application, the solution’s core functionality. The program allows partners and community members to contribute code and suggestions to the Base Application.
The open-source program for Business Central is an excellent opportunity for anyone who wants to learn more about the solution, contribute to its development, and benefit from its features.
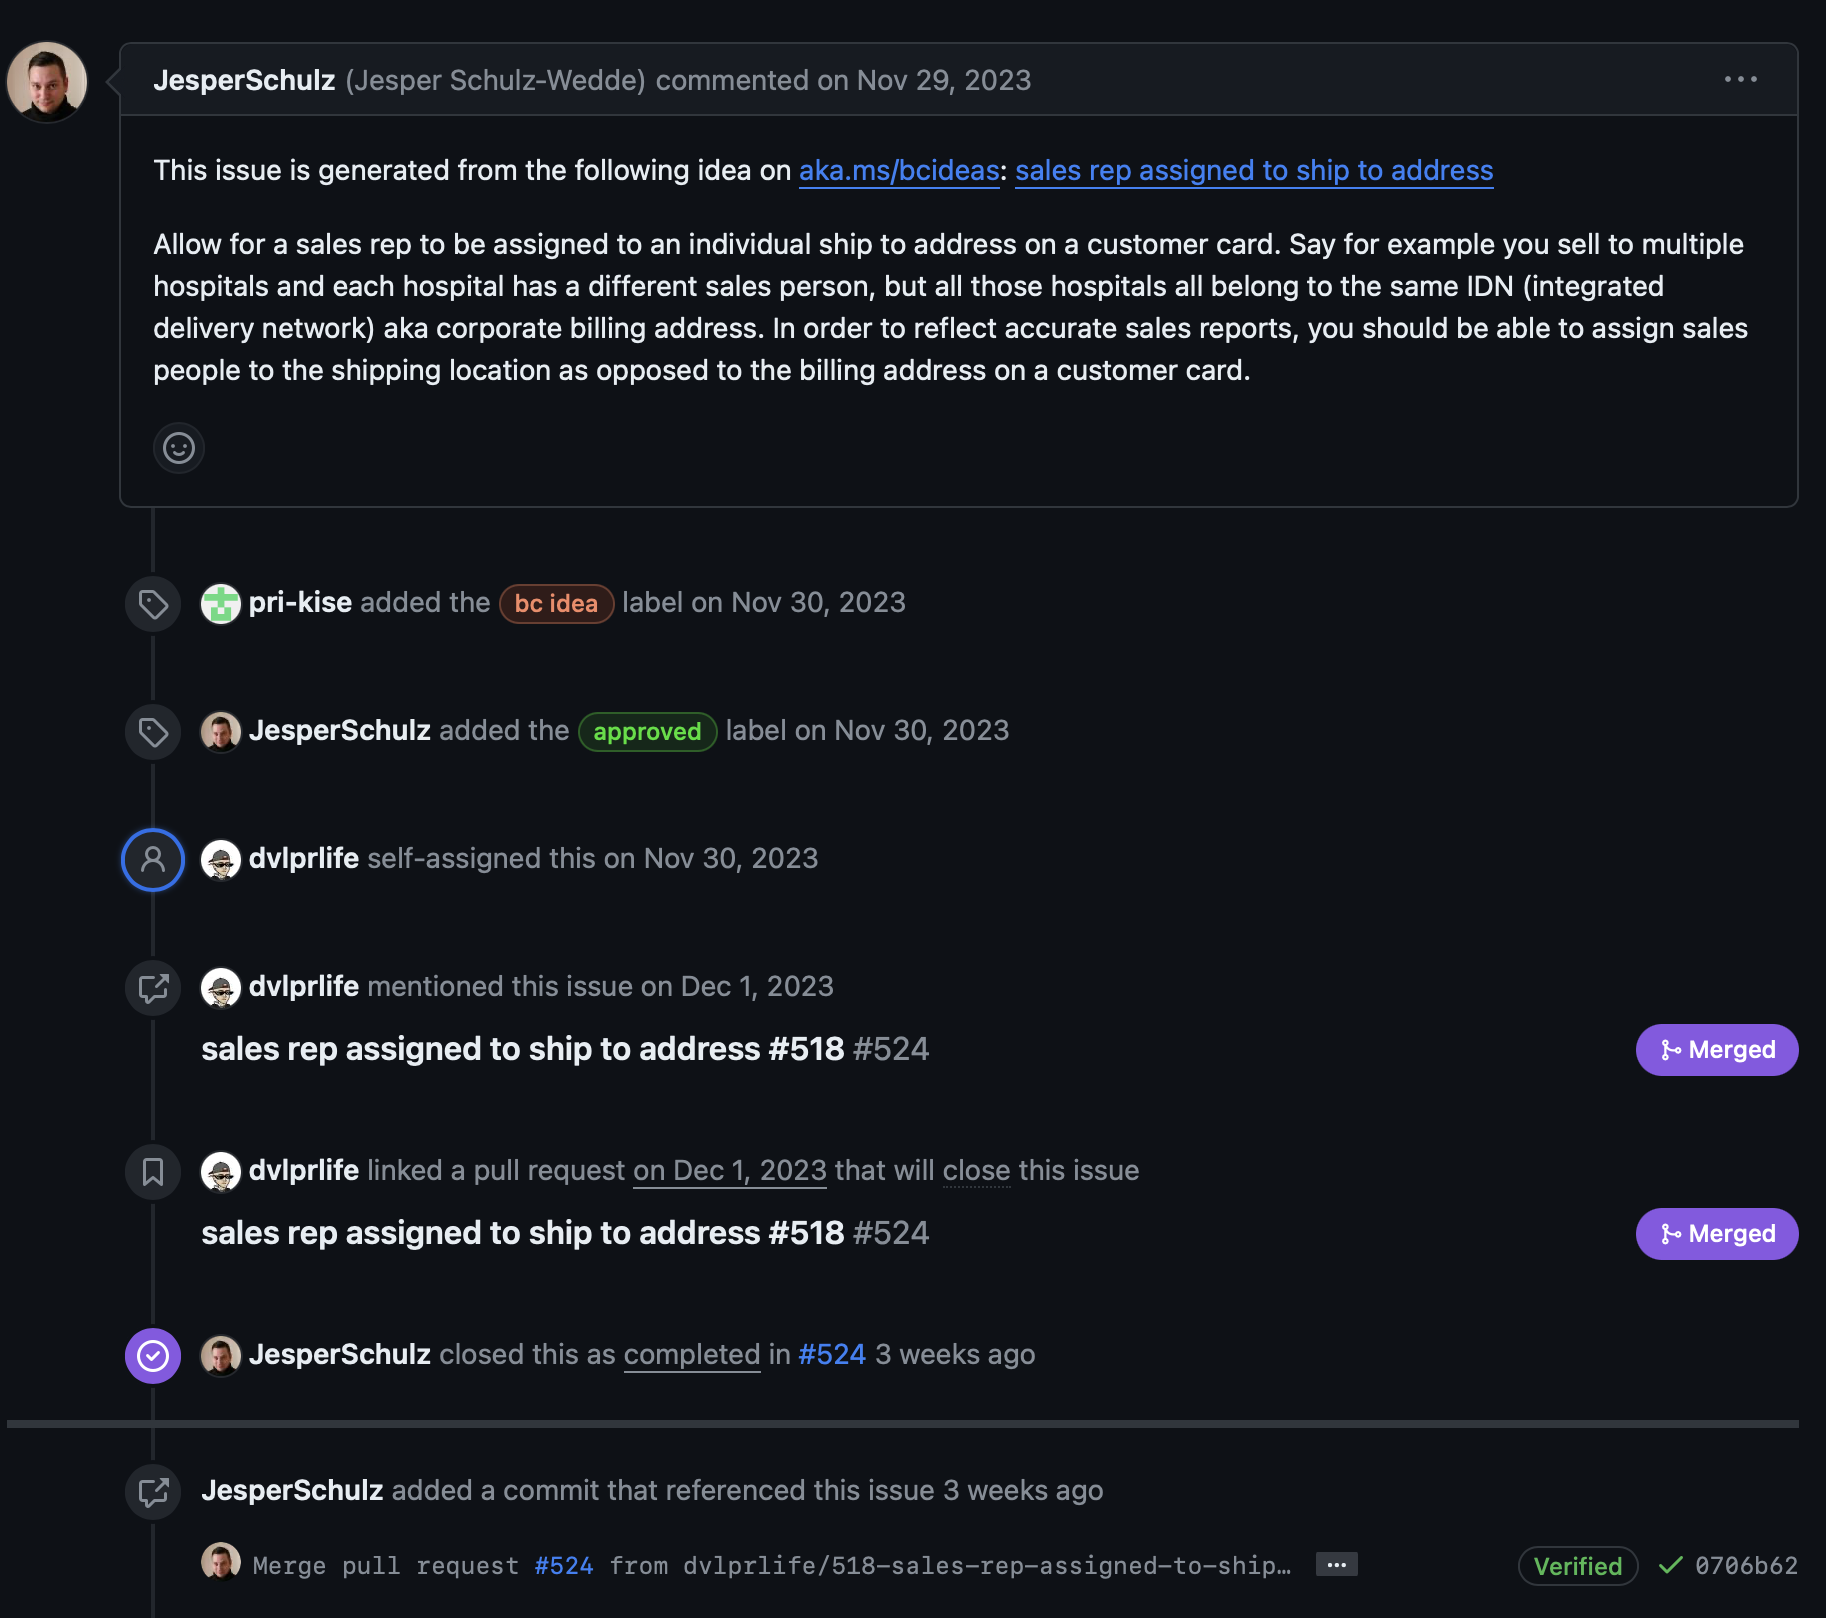
In May 2023, we were fortunate enough to converse with Jesper and KB on the Dynamics Corner Podcast about Empowering Community Contributions. During that podcast, I asked, “How do you get started with open source?” to which both Jesper and KB responded. KB suggested observing and participating in the Pull Requests to see how the process works. After the episode, I was more excited about the program than before and started following the activity a bit more closely. I watched the interactions between community members, contributors, and Microsoft. After a period, I felt comfortable jumping into the pool and trying my hand at contributing to the base app.
First Steps
The BusinessCentralApps repository is private; you must request access before you begin. If you want to participate in the Microsoft Dynamics 365 contribution pilot, message Jesper on Yammer (Viva Engage). Let him know I sent you and request access to the BusinessCentralApps repository on GitHub.
After watching, as suggested, the lifecycle of issues, the interaction between contributors, and the pull request process for a period, it was time for me to get going. I have been working with Business Central my entire career and was excited at the opportunity to contribute to the Base App.
I forked the repository and created a new branch for the issue. With an issue assigned and a working branch, I was excited to begin working on it. There was one more thing I needed: an environment to work in – one that allowed me to edit, package, and publish the BaseApp, which is different from the usual Business Central development. Development in Business Central is done with extensions that extend or interact with the Base Application. So, I needed to make a Docker container that allowed for the packaging and installing my modified version of the BaseApp. Sounds easy, but how?
The Environment
Now that I had an issue and a repository with a branch to work in, I needed a place to do all the magic. I needed an environment. Publishing the BaseApp file to an Online Environment, Production, or Sandbox is prohibited. Therefore, I needed a local environment, and thankfully, I used Docker regularly and knew a container would work for the cause. (Note: Docker and BCContainerHelper are required for this process)
There are two ways to create a local environment that allows the modification of the BaseApp: The Manual Way and The Easy Way. I’ll cover the manual way first. You never know if you’ll want to set up a container that allows modifying the BaseApp without access to the Contribution Pilot Repository. If you’re not interested in the manual process, then jump to The Easy Way.
The Manual Way
Create a container using BCContainer helper for the latest W1 artifact (or the version that matches the repo). The BaseApp repository is the W1 version; you should work with the same.
Once the container is built, you need a Business Central Base App project. BCContainerHelper to the rescue! Within BCContainerHelper there is a function Create-AlProjectFolderFromBcContainer. The Create-AlProjectFolderFromBcContainer creates a VS Code project from a container.
With the project created, we’re ready to get moving. Before we can have some fun, we need to, well, I needed to open the BaseAndTests workspace and make a few changes. Change the app file version to something higher than the current app version. Add the “tenant”: “default” to the launch file created as part of the project.
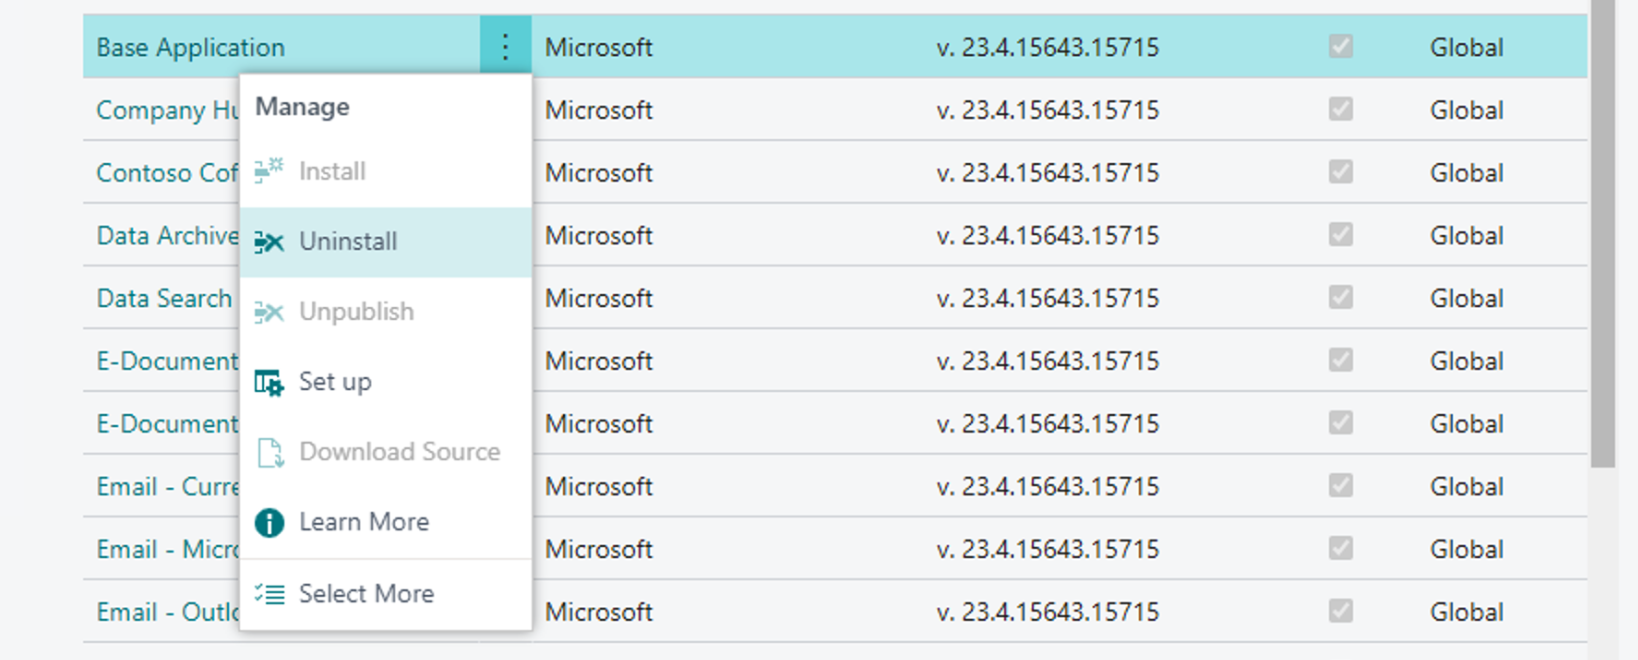
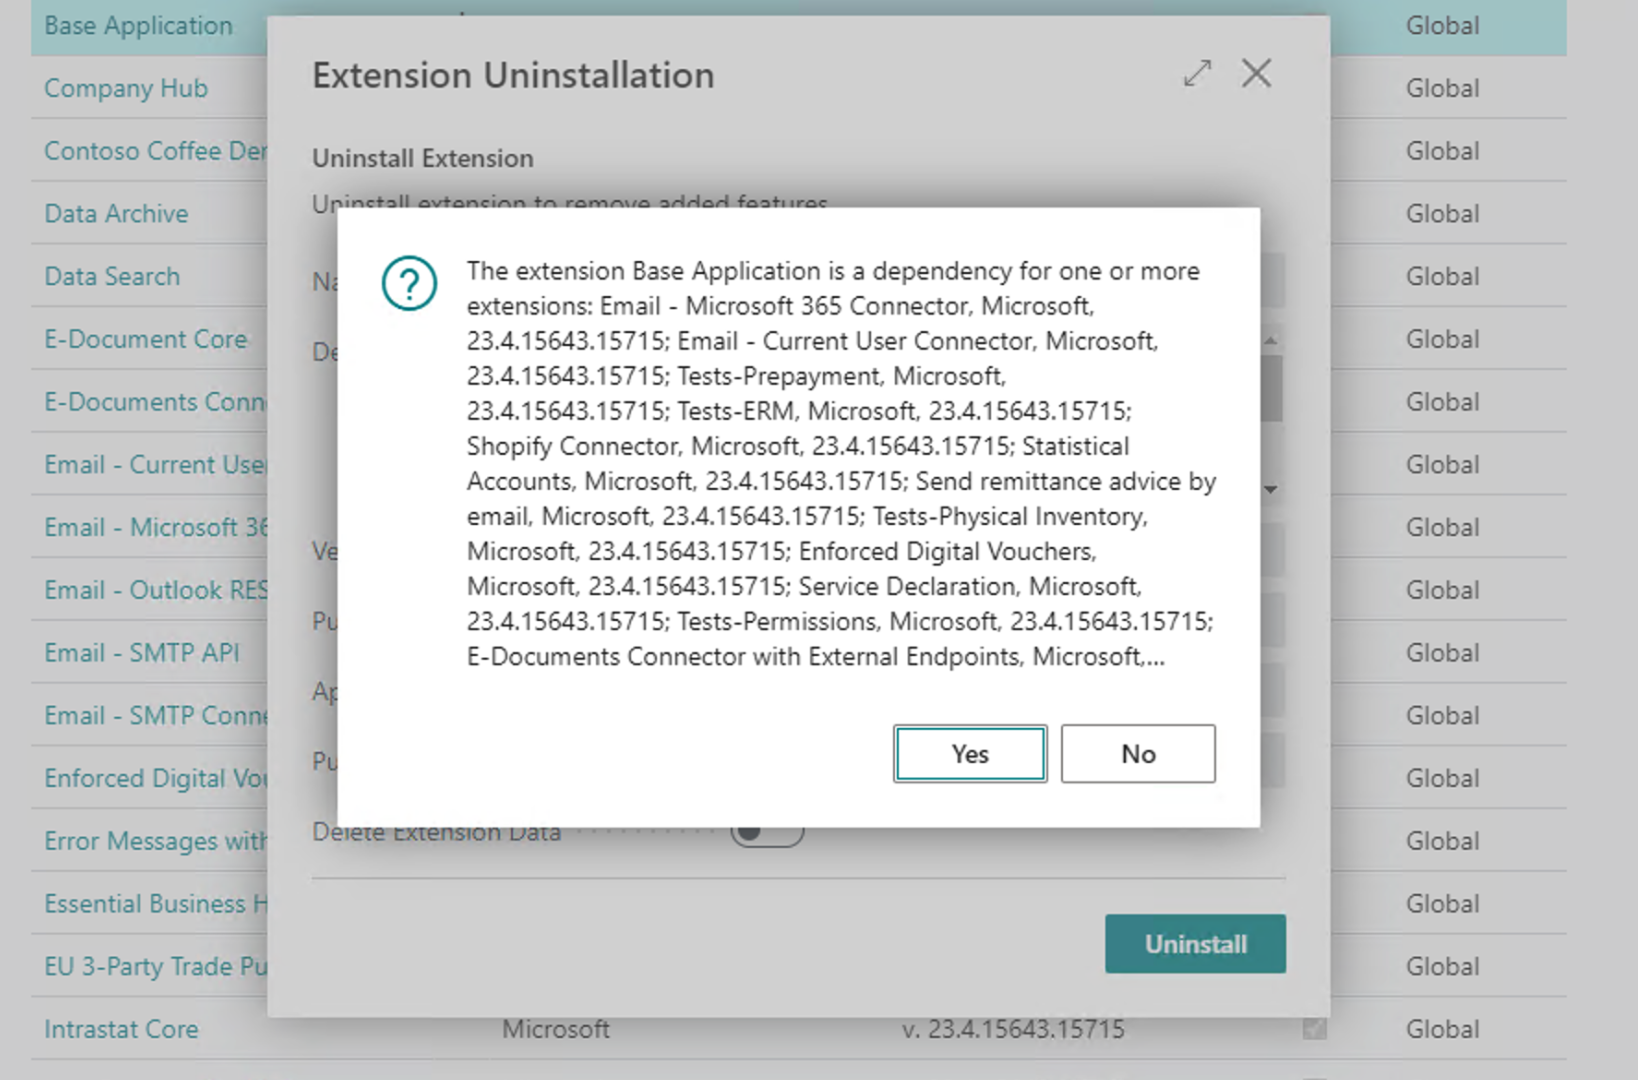
The next thing to do is download symbols from your container, open up your Business Central container, and uninstall the Base App through extension management. When you uninstall the Base App, all the dependent apps will also be uninstalled.
Package your version of the Base App and Publish it to your container using the BCContainerHelper’s Publish-NavContainerApp function.
Microsoft has made it simple to create a development environment for modifying the BaseApp. This makes it easier for more developers to contribute, eliminating the need to do anything outside the standard development lifecycle besides running a script. As developers, let’s focus on what we do best – develop.
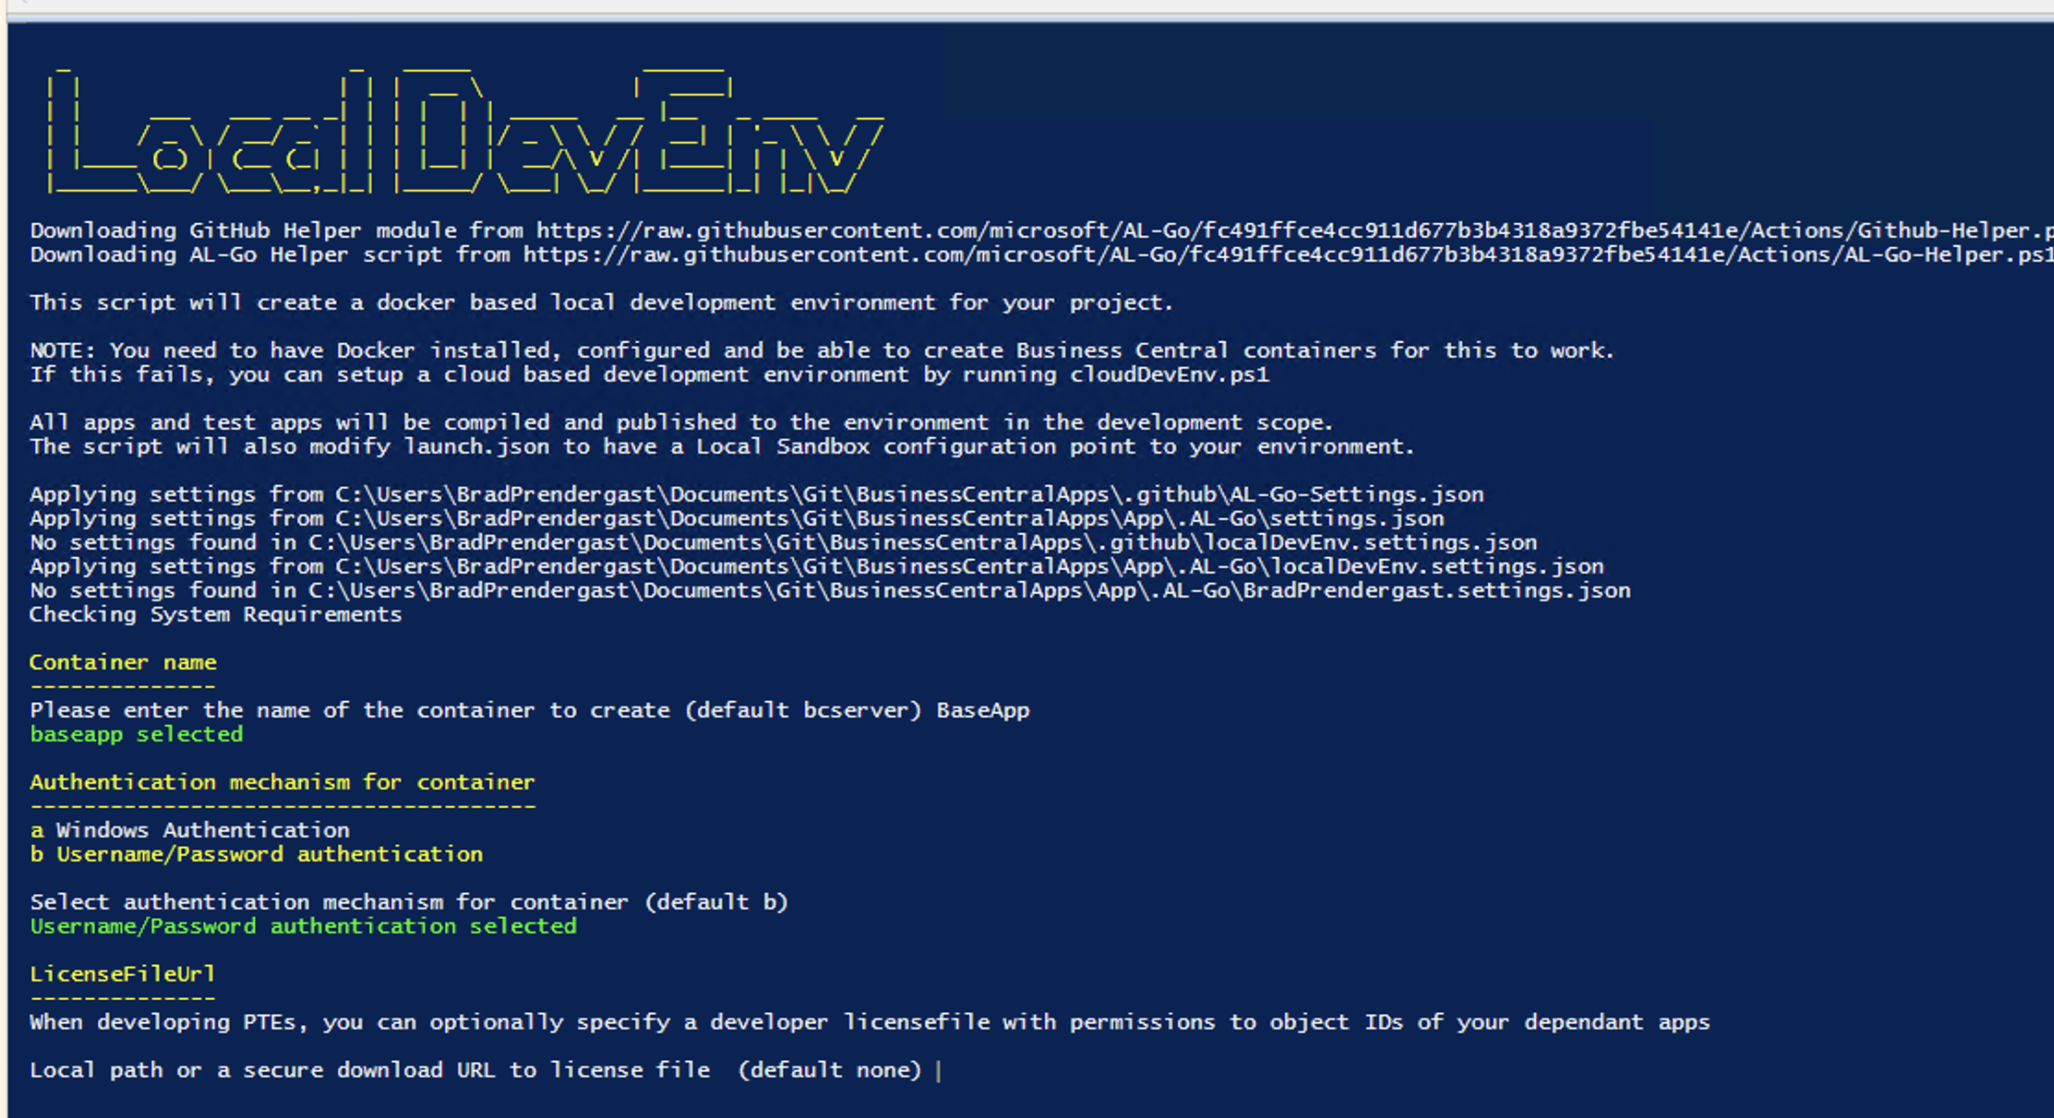
Browse to the \BusinessCentralApps\App\.AL-Go folder and run the localDevEnv.ps1 PowerShell Script. The script will prompt you for the Container Name, authentication mode, and license file. The license file is used for specific scenarios, not general contributions, and does not need to be loaded. Accept the license agreement, and you’re off.
Note: You may need to install the GitHub CLI on your environment and authenticate with your GitHub login. The commands are listen below. You’ll need to follow the prompts.
winget install --id GitHub.cli
gh auth login
After you built the environment (container), if you do not have system settings for the al.assemblyProbingPaths, open the BaseAndTests.code-workspace and add it or the local project settings file and add the path to your container packages. Listed is an example of what I use for the probing path settings:
After cloning your repository and building your environment, you can develop and publish from VS Code to your container with the BaseAndTests.code-workspace.
The Changes
I had an issue assigned and a usable environment set up. All that was left was to develop the changes to solve the requirement listed in the issue. I worked through the changes and committed them to my working branch. With my committed modifications and satisfaction with the changes, I nervously created a Pull Request and patiently waited for something to happen, and it did….
I started receiving valuable feedback on the Pull Request from community members. There were several changes and back and forth, which all resulted in a better contribution. After a few iterations, I woke up one morning to…
The Approval
The whole process took about six weeks and was well worth it. It was a fantastic experience that helped me drive towards better code, understand more of the process, and leave me proud to have contributed. I look forward to making many more enhancements to the base app.
I am excited to have a contribution that will be part of the April 2024 wave release of Business Central. The pull request can be found here .
We were fortunate to follow up with Jesper, KB, and Andrei on another In the Dynamics Corner Chair episode in February 2024. Listen to both episodes, head to the BusinessCentralApps repository, and contribute!
Together, we win!
Episode 216: In the Dynamics Corner Chair: MSDYN365BC Empowering Community Contributions
Episode 302: In the Dynamics Corner Chair: Projects, Legos and Contribution Pilot, Oh-My!
Permanent link to this article: https://www.dvlprlife.com/2024/02/microsoft-dynamics-365-business-central-my-adventures-with-the-baseapp-contribution-pilot/
The February updates for Microsoft Dynamics 365 Business Central are now available.
Before applying the updates, you should confirm that your implementation is ready for the upgrade and ensure compatibility with your modifications. Work with a Microsoft Partner to determine if you are ready and what is needed for you to apply the update.
Please note that Online customers will automatically be upgraded to version 23.4 over the coming days/weeks and should receive an email notification when upgraded.
The Microsoft Dynamics Nav links were removed from this post. They are still available on older posts.
Direct links to the cumulative updates are listed here:
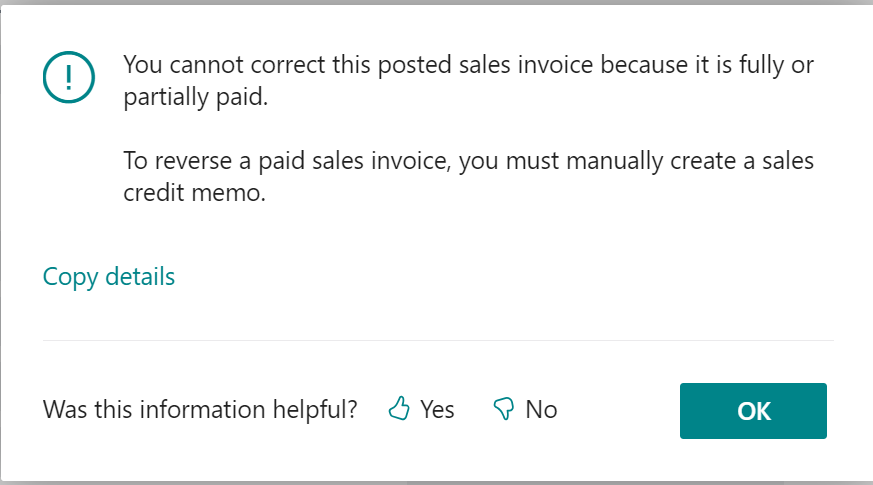
Q. I made a mistake on an invoice and need to correct a posted invoice. How can I do this?
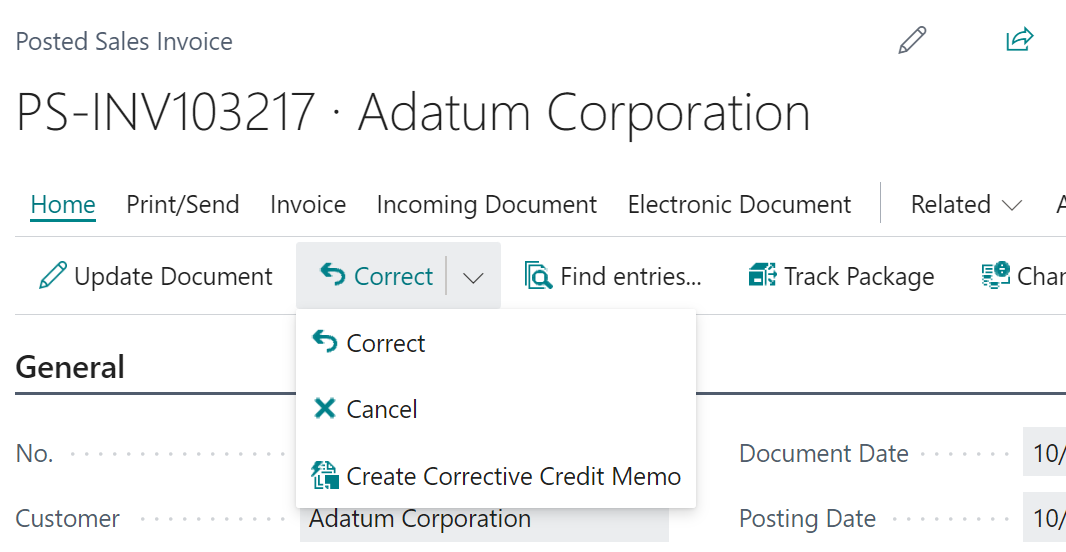
A. You cannot directly edit a posted sales invoice. Instead, a sales credit memo must be created and applied to the posted document. Then, a new invoice with the corrections must be created. There are several ways to do this easily in Microsoft Dynamics 365 Business Central.
If the sales invoice has not been partially or fully paid, you can correct or cancel it directly from the posted sales invoice.
Navigate to the posted document that you would like to correct. The “Correct” action group, found on the action bar, has three options available for you to correct the invoice:
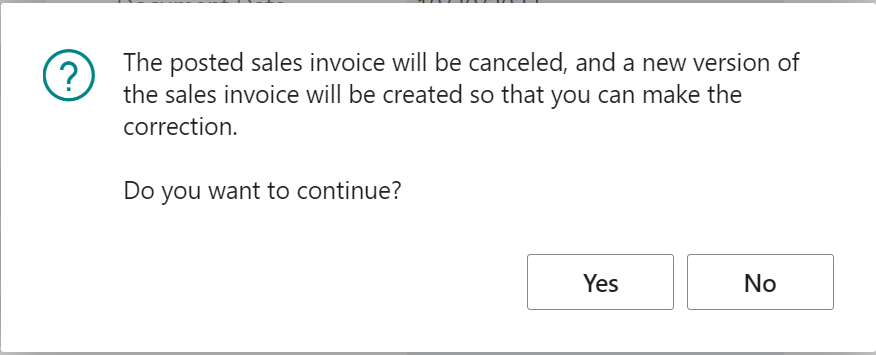
Correct – A corrective sales credit memo is automatically created and posted to void the initial posted sales invoice. The Canceled and Paid check boxes are marked on the initial posted sales invoice, and the Corrective check box is marked on the sales credit memo. If the original invoice was not created from a sales order, a new sales invoice is created that you can edit with the correct information (Note: the new sales invoice has a different document number.) If the sales invoice originated from a sales order, first “Cancel” the posted sales invoice, and then make the correction from the original order and continue the sales process.
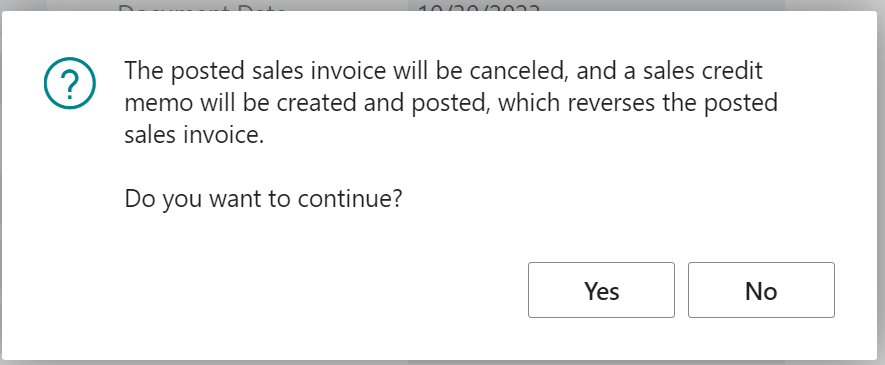
Cancel – A corrective sales credit memo is automatically created and posted to void the initial posted sales invoice. The Canceled and Paid check boxes are marked on the initial posted sales invoice. You can manually create a new sales document or use the copy document function.
Create Corrective Credit Memo – A new sales credit memo is created with the same information. The new sales credit memo may be adjusted before posting and will be applied to the original invoice when posted.
If the invoice has been partially or fully paid, or if you would like to credit the invoice partially, You can manually create a new sales credit document or use the copy document function.
Read more on Correct or Cancel Unpaid Sales Invoices here.
Read more on how to Process Sales Returns or Cancellations here.
Note: The code and information discussed in this article are for informational and demonstration purposes only. This content was created referencing Microsoft Dynamics 365 Business Central 2023 Wave 2 online.
Permanent link to this article: https://www.dvlprlife.com/2024/01/real-things-im-asked-microsoft-dynamics-365-business-how-do-i-credit-and-rebill-a-posted-invoice/

 To access the In-client page scripting tool, open the Settings menu and select the Page Scripting Action. This will open the Page Scripting dialog, where you can start a new recording or open a previously recorded script. It’s that easy!


 available.